I was standing in my kitchen, mid‑Monday, with a half‑empty pantry and a sudden, insistent craving for something that felt both indulgent and effortless. My usual go‑to was a store‑bought cheesecake, but the moment I lifted the lid I could hear the faint sigh of disappointment—nothing beats the feeling of a dessert you made yourself, especially when it’s as light as a cloud and as bright as a summer sunrise. I tossed a handful of fresh cherries into a bowl, grabbed the only thing that looked like a “cheesecake” on the shelf, and thought, “What if I could combine the tang of cherry with the silk of cheesecake without ever turning on the oven?” That thought turned into a dare: I would create the ultimate no‑bake cherry cheesecake fluff, and I would prove it could outshine every baked version you’ve ever tried.
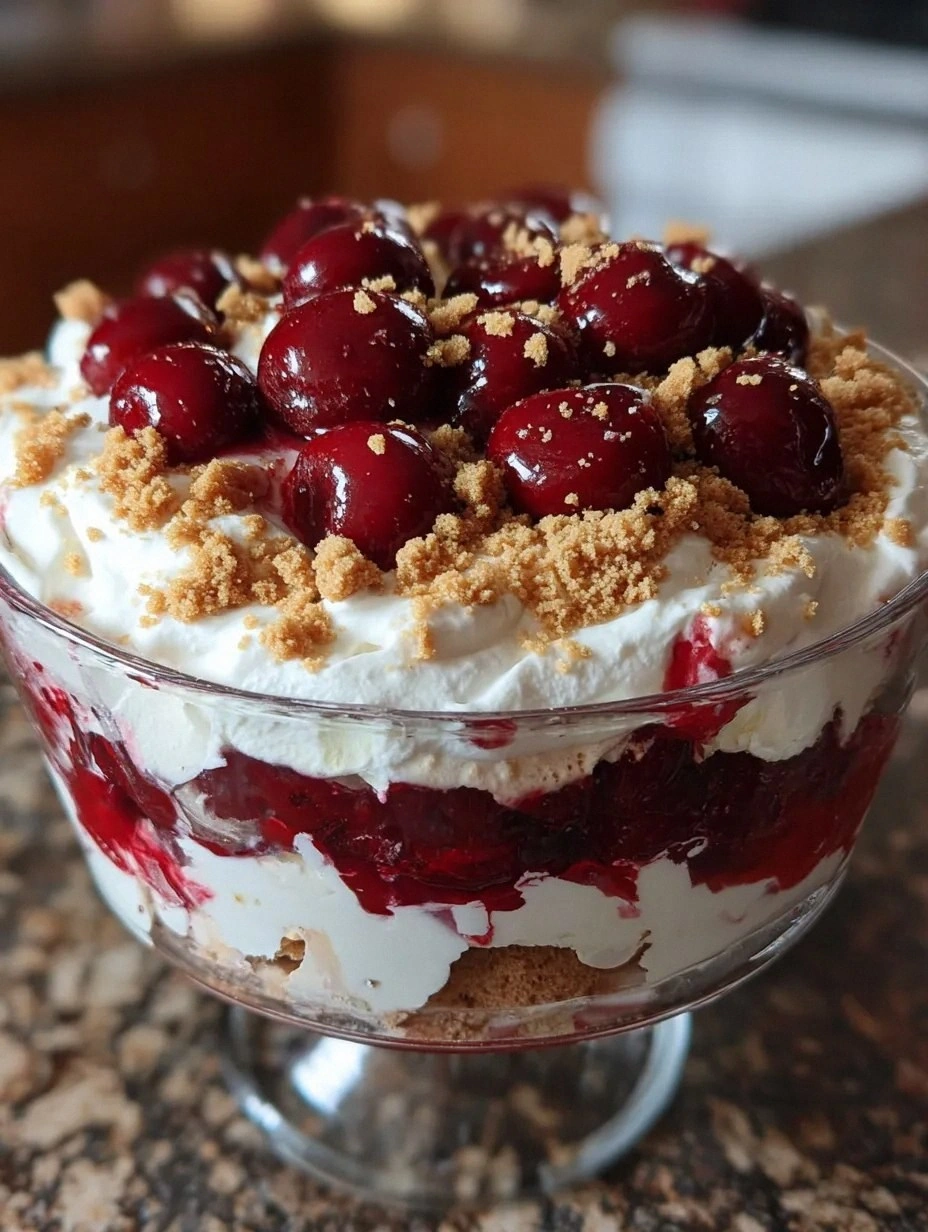
Picture this: the first bite hits your tongue with the airy lift of a whipped mousse, then the buttery crumb crust snaps gently, and finally the tart cherry jam bursts like fireworks on a quiet night. The aroma of vanilla and toasted butter wafts through the room, the glossy cherry glaze catches the light, and the texture is so smooth it practically slides across your palate. You hear the faint sigh of satisfaction from your guests as they slice through the fluff, the gentle clink of a fork against the plate, and the soft murmur of “more, please!” echoing around the table. The whole experience feels like a celebration of summer’s best fruit wrapped in a timeless dessert classic.
Most cherry cheesecake recipes either demand a hot oven, a long chill, or a confusing array of steps that leave you wondering if you’ve missed a crucial ingredient. This version flips the script. It’s a no‑bake marvel that relies on the chemistry of cream cheese, whipped cream, and a dash of gelatin to achieve that signature fluff without any heat. The secret? A whisper of lemon juice to brighten the cherries and a quick, three‑minute whip that turns heavy cream into a cloud‑like scaffold. I’m about to spill the beans on that technique, and trust me, it’s a game‑changer you won’t find in any other recipe.
If you’ve ever struggled with a cheesecake that turned out dense, cracked, or just plain boring, you’re not alone—my kitchen has seen its fair share of failures. I’ll be honest—I ate half the batch before anyone else got a chance to try it, and that’s exactly why I’m sharing every single detail with you. I dare you to taste this and not go back for seconds. Let me walk you through every single step — by the end, you’ll wonder how you ever made it any other way.
What Makes This Version Stand Out
- Lightness: The whipped‑cream foundation creates a fluffiness that rivals a soufflé, yet it stays stable thanks to a touch of gelatin. No more heavy, grainy bites.
- Flavor Punch: Fresh cherries and a splash of lemon juice give a bright, tangy contrast to the sweet, buttery base, making each forkful sing.
- Simplicity: Only ten ingredients, no oven, and a total time under an hour. Perfect for a last‑minute dinner party or a lazy weekend treat.
- Visual Wow: The glossy cherry glaze on top looks like a jewel‑encrusted crown—Instagram‑ready without any artificial frosting.
- Crowd Reaction: Guests often claim they’ve never tasted a “no‑bake” dessert that feels this luxurious; it’s the kind of dessert that earns you applause.
- Ingredient Quality: Using real cherry jam and high‑fat cream cheese makes the flavor richer than any processed mix.
- Make‑Ahead Potential: Assemble the night before, chill, and serve fresh the next day—no last‑minute stress.
- Adaptability: Swap cherries for berries, add a splash of liqueur, or sprinkle toasted nuts for a personalized twist.
Inside the Ingredient List
The Flavor Base
The heart of this fluff is a blend of cream cheese and powdered sugar. Cream cheese brings that unmistakable tang and creamy richness, while powdered sugar sweetens without adding grainy texture. If you skimp on the cream cheese, the fluff will feel flat and lack that luxurious mouthfeel. For a dairy‑free version, try a high‑fat coconut cream mixed with a splash of lemon juice, but expect a subtle coconut note to emerge.
The Texture Crew
Heavy whipping cream is the secret scaffolding that lifts the entire dessert into the clouds. Whipping it to stiff peaks creates a stable network that holds the cheesecake mixture together. Skip the gelatin, and your fluff will collapse after a few minutes; add too much, and you’ll get a rubbery texture. A quick tip: add a pinch of cream of tartar when you start whipping; it stabilizes the foam and makes it easier to achieve those glossy peaks.
The Unexpected Star
Cherry jam is more than just a topping; it’s an integral flavor component that infuses the entire dessert with fruit‑forward brightness. Opt for a jam that contains real cherries and minimal added sugars—this ensures the tartness cuts through the richness. If you can’t find cherry jam, blend frozen cherries with a splash of maple syrup and simmer until thickened. The result will be a vibrant, slightly less sweet glaze that still delivers that signature pop.
The Final Flourish
The crust, made from graham cracker crumbs and melted butter, provides a buttery crunch that anchors the airy fluff. Use full‑fat butter for the richest flavor; low‑fat alternatives will make the crust soggy. For a gluten‑free twist, substitute with almond meal or gluten‑free graham crackers—just be mindful that the texture will be a tad denser, which can actually complement the lightness of the fluff.
Everything's prepped? Good. Let's get into the real action...
The Method — Step by Step
First, crush the graham crackers into fine crumbs—either by pulsing them in a food processor or sealing them in a zip‑top bag and bashing them with a rolling pin. The goal is a texture that resembles fine sand, not chunky pieces. Mix the crumbs with the melted butter until the mixture looks like wet sand, then press it firmly into the bottom of a 9‑inch springform pan. The crust should be even and compact; this is the foundation that will keep the fluff from sliding around.
Kitchen Hack: Lightly spray the pan with non‑stick spray before adding the crust; it makes removal a breeze and preserves that perfect edge.While the crust sets in the fridge, whisk together the softened cream cheese and powdered sugar in a large bowl. Use a hand mixer on medium speed until the mixture is silky smooth—no lumps allowed. This is the moment where you can taste the tangy depth of the cheese; if it feels too sharp, add a teaspoon of vanilla extract to mellow it out.
In a separate chilled bowl, pour the heavy whipping cream, add a pinch of cream of tartar, and begin beating on high speed. As the cream starts to thicken, watch for soft peaks forming—this is the point where the cream looks glossy but still droops slightly when the whisk is lifted. Then, add a tablespoon of lemon juice; this brightens the flavor and stabilizes the foam.
Now, fold the whipped cream into the cream‑cheese mixture. Use a spatula and a gentle, lifting motion; you’re building air into the mixture, not deflating it. The texture should become light, airy, and just a shade whiter than the original cheese blend. If you over‑mix, the fluff will lose its volume—so be patient and keep the movements gentle.
For the cherry glaze, combine the cherry jam, fresh halved cherries, and a splash of water in a small saucepan. Heat over medium‑low until the jam loosens, stirring occasionally. Once it reaches a syrupy consistency, remove from heat and let it cool slightly—this prevents the glaze from melting the fluff when poured.
Watch Out: Do not boil the cherry mixture vigorously; high heat can break down the pectin and give you a runny sauce instead of a glossy glaze.Once the crust is firm (about 10 minutes in the fridge), spoon the fluffy cheesecake mixture over the crust, spreading it evenly with an offset spatula. The surface should be smooth, with no visible cracks. This is the part where you’ll feel a sense of triumph—your fluff is finally taking shape.
Drizzle the warm cherry glaze over the top, allowing it to cascade down the sides in rivulets. Use the back of a spoon to gently swirl the glaze, creating a marbled effect. Sprinkle toasted almond slivers (if using) for an extra crunch that contrasts the soft interior.
Kitchen Hack: Toast the almonds in a dry skillet over medium heat for 3‑4 minutes, stirring constantly, until they turn golden and fragrant.Cover the pan with plastic wrap and place it in the refrigerator for at least 2 hours, preferably overnight. This chilling step allows the gelatin (if you used it) to set and the flavors to meld. When you finally cut a slice, the fluff should hold its shape, the crust should stay crisp, and the cherry glaze should glisten like a ruby.
To serve, run a thin knife around the edge of the springform pan, release the latch, and gently lift the sides away. Slice with a warm knife (dip it in hot water and wipe dry) for clean cuts. Serve each piece with a dollop of extra whipped cream if you’re feeling extra indulgent.
That's it — you did it. But hold on, I've got a few more tricks that'll take this to another level...
Insider Tricks for Flawless Results
The Temperature Rule Nobody Follows
Never whisk cream cheese straight out of the fridge; let it sit at room temperature for 20‑30 minutes. This small step prevents lumps and ensures a smoother blend with the powdered sugar. I once tried to skip this, and the result was a gritty texture that ruined the entire fluff. Trust me, the extra patience pays off in a silk‑smooth mouthfeel.
Why Your Nose Knows Best
When the cherry glaze is heating, listen for a faint hiss—not a roar. That gentle sizzle signals the jam is loosening without scorching. If you hear a vigorous boil, you’ve crossed the line and the glaze will lose its shine. Your nose can also detect when the glaze is ready: a sweet, fruity aroma that fills the kitchen is the cue to remove it from the heat.
The 5‑Minute Rest That Changes Everything
After folding the whipped cream into the cheese mixture, let the bowl sit for five minutes before spreading. This pause lets the air bubbles stabilize, preventing the fluff from collapsing when you move it to the pan. A friend once rushed this step and ended up with a flat, pancake‑like dessert—lesson learned.
Gelatin Whisper
If you live in a humid climate, add a quarter teaspoon of unflavored gelatin dissolved in warm water to the cream‑cheese mixture. This tiny amount acts like a safety net, keeping the fluff firm even on the hottest days. The gelatin dissolves completely, so you won’t taste it, but the structure stays intact.
The Almond Crunch Secret
Toast your almond slivers on low heat and then immediately toss them with a pinch of sea salt. The salt amplifies the nutty flavor and adds a pop that balances the sweet cherry glaze. I tried skipping the salt once and the nuts tasted bland—never again.
Creative Twists and Variations
This recipe is a playground. Here are some of my favorite ways to switch things up:
Berry Blitz
Swap cherry jam for mixed‑berry compote (strawberries, blueberries, raspberries). The tart‑sweet medley adds a vibrant color palette and a slightly different acidity that pairs beautifully with the cream cheese.
Chocolate Lover’s Dream
Stir 2 tablespoons of melted dark chocolate into the cream‑cheese mixture before folding in the whipped cream. Finish with a drizzle of chocolate ganache instead of cherry glaze. Chocolate fans will swoon.
Tropical Twist
Replace fresh cherries with diced mango and pineapple, and use a mango‑coconut jam for the glaze. The tropical flavors turn this dessert into a vacation on a plate.
Nutty Caramel Crunch
Add a layer of caramel sauce and sprinkle crushed pistachios on top. The caramel adds buttery depth while pistachios contribute a salty crunch.
Adult‑Only Edition
Mix a tablespoon of cherry liqueur (like kirsch) into the glaze and a splash of bourbon into the cream‑cheese base. The alcohol intensifies the fruit flavor and adds a sophisticated warmth.
Storing and Bringing It Back to Life
Fridge Storage
Cover the cake tightly with plastic wrap or store it in an airtight container. It will keep fresh for up to 4 days. The crumb crust may absorb a little moisture, so place a sheet of parchment between the wrap and the surface if you notice sogginess.
Freezer Friendly
Slice the fluff into individual portions, wrap each piece in cling film, then place them in a freezer‑safe bag. They freeze beautifully for up to 2 months. To serve, transfer to the fridge overnight and let them thaw slowly.
Best Reheating Method
Although this is a no‑bake dessert, if you prefer a slightly warmed cherry glaze, gently microwave the glaze for 10‑15 seconds, then drizzle over the chilled fluff. Adding a tiny splash of water (about a teaspoon) before warming restores the glaze’s shine and prevents it from drying out.