I was standing in my kitchen on a sweltering Saturday afternoon, the grill humming like a lazy cat, when my roommate dared me to make something that would actually survive a backyard barbecue without turning into a soggy mess. I laughed, grabbed a block of halloumi that had been lounging in the fridge for weeks, and shouted, “Challenge accepted!” What followed was a cascade of sizzling sounds, the sweet perfume of charred vegetables, and a revelation that would forever change my grill game. That moment, drenched in the smell of olive oil and lemon zest, felt like discovering a secret level in a video game—except the reward was edible and infinitely more satisfying.
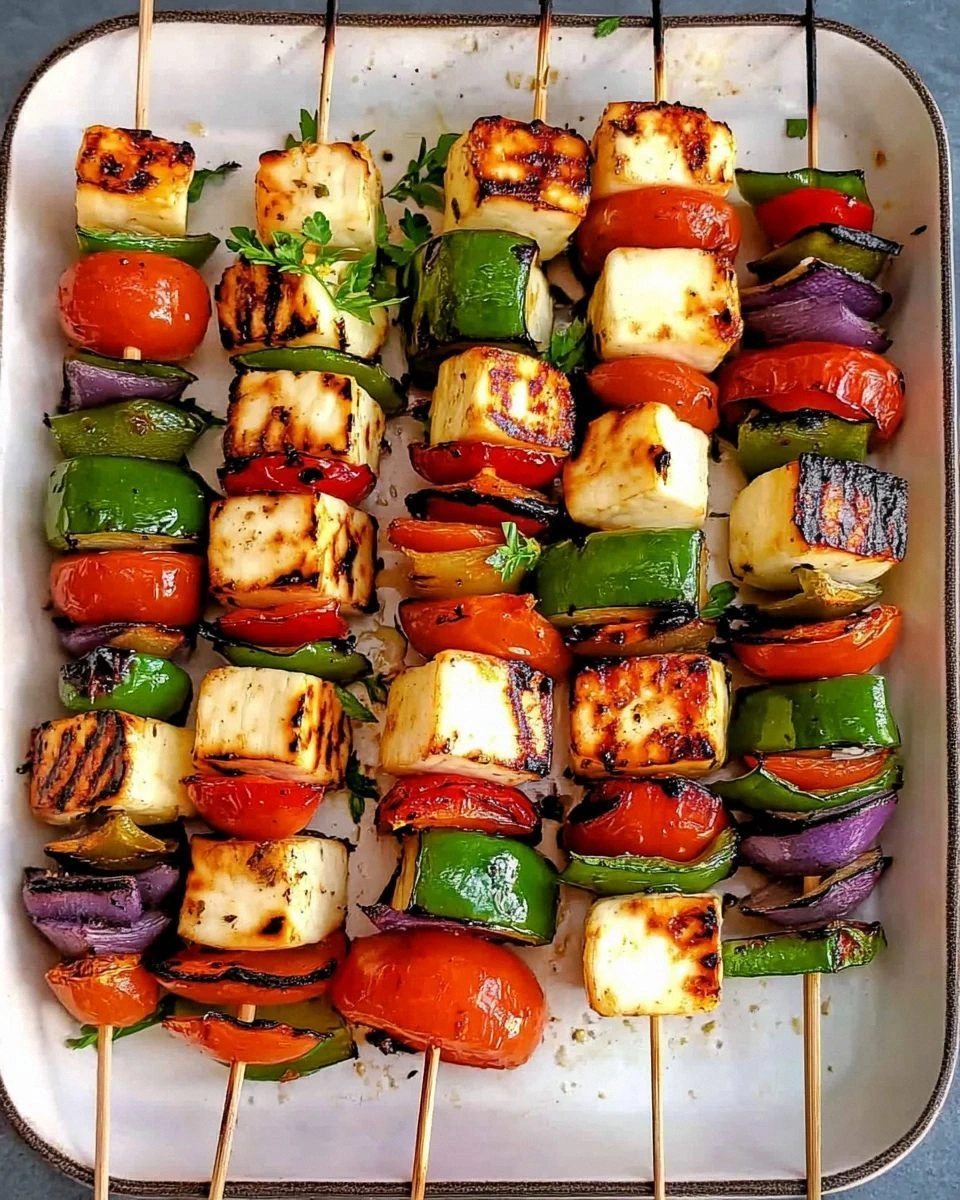
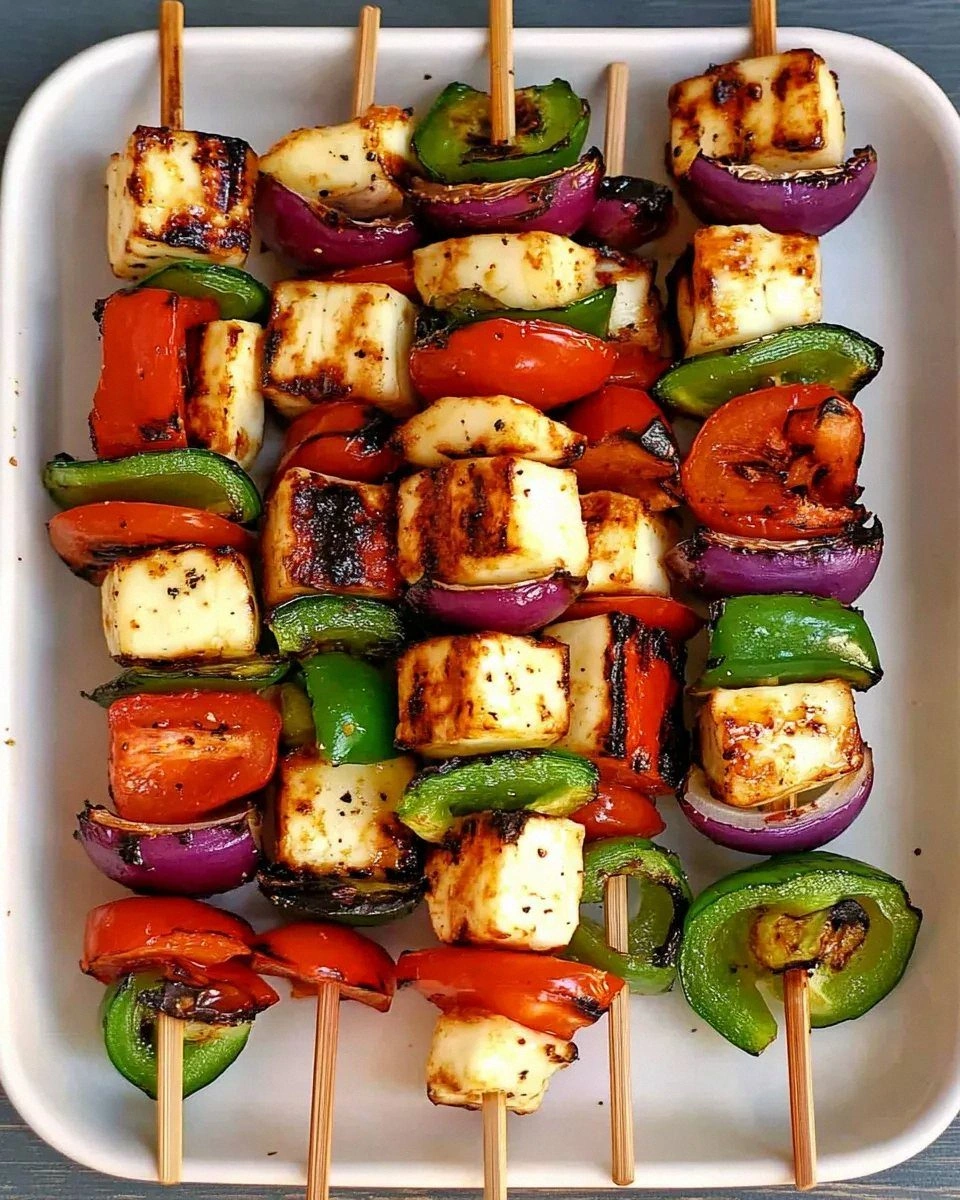
Picture this: bright orange and crimson bell peppers, glossy zucchini slices, and ruby cherry tomatoes dancing on skewers, each piece kissed by a golden crust of halloumi that refuses to melt away. The grill’s heat sears the cheese into a crunchy exterior while the interior stays delightfully squeaky, like a firm tofu that’s been given a makeover. The vegetables, meanwhile, develop caramelized edges that shatter like thin ice, releasing a burst of smoky sweetness that makes your mouth water before the first bite even lands. The whole scene is a symphony of crackles, pops, and the occasional “sizzle” that feels like applause from the grill itself.
Most halloumi skewers I’ve tried in the past ended up either too rubbery or so overcooked that the cheese turned into a salty brick. That’s because the secret isn’t just the cheese—it’s the balance of a quick sear, a well‑timed brush of citrus‑infused oil, and a precise order of assembly that lets each component shine without stealing the spotlight. I dare you to taste this and not go back for seconds; the combination of salty, smoky, and bright is hands down the best version you’ll ever make at home. Most recipes get this completely wrong. Here’s what actually works: a short, high‑heat grill, a light coating of oil, and a dash of lemon right before serving.
But wait—there’s a twist that most cooks overlook: a splash of white wine in the marinade. That splash adds a subtle acidity that lifts the whole dish, making the cheese feel less heavy and the vegetables brighter. I’ll be honest — I ate half the batch before anyone else got to try it, and that was the only time I ever felt guilty about a grilled dish. Okay, ready for the game‑changer? Let me walk you through every single step — by the end, you’ll wonder how you ever made it any other way.
What Makes This Version Stand Out
- Flavor Explosion: The lemon‑olive‑oil glaze adds a zing that cuts through the cheese’s salt, while oregano brings a Mediterranean whisper that feels like a sunny patio in every bite.
- Texture Contrast: Halloumi’s firm, squeaky interior meets a crisp, caramelized crust, while the veggies provide a tender‑yet‑slightly‑firm bite that keeps the palate entertained.
- Simplicity: Fewer than ten ingredients, minimal prep, and a grill that’s already hot—no fancy gadgets required, just a sturdy set of wooden skewers.
- Uniqueness: The addition of a splash of white wine in the marinade is a secret I stole from a Greek taverna, giving the skewers a depth most recipes lack.
- Crowd Reaction: Guests constantly ask for the recipe, and the bright colors make it a centerpiece that looks as good as it tastes—perfect for picnics or impromptu dinner parties.
- Ingredient Quality: Using a firm, fresh halloumi (not the pre‑packed watery kind) ensures that each cube holds its shape and delivers that coveted squeak.
- Cooking Method: A quick, high‑heat sear locks in juices, while the brief brush of oil prevents sticking and gives a glossy finish.
- Make‑Ahead Potential: You can assemble the skewers up to an hour ahead, keep them refrigerated, and finish grilling right before serving—no compromise on flavor.
Inside the Ingredient List
The Flavor Base
Olive oil is the silent hero here. Its fruity notes coat every piece, ensuring the halloumi doesn’t stick while also acting as a carrier for the lemon juice and oregano. If you substitute with a neutral oil like canola, you’ll lose that subtle richness, and the dish will feel a bit flat. For the most aromatic result, choose a cold‑pressed extra‑virgin olive oil that’s just a shade too green.
The Texture Crew
Halloumi itself is a marvel—its high protein content makes it firm enough to hold up on a skewer, while its low moisture means it won’t melt into a puddle. If you can’t find halloumi, a firm paneer works as a fallback, but expect a milder flavor. The vegetables—bell peppers, zucchini, red onion, and cherry tomatoes—each bring their own textural nuance: peppers offer a sweet crunch, zucchini gives a buttery bite, onions add a caramelized bite, and tomatoes burst with juicy acidity.
The Unexpected Star
A splash of white wine in the marinade is the curveball that elevates the whole dish. The alcohol evaporates quickly on the grill, leaving behind a whisper of acidity that brightens the cheese and vegetables. If you’re avoiding alcohol, replace it with an equal amount of apple cider vinegar, but the flavor profile will shift slightly toward fruitiness.
The Final Flourish
Fresh lemon juice added right before serving adds a pop of brightness that cuts through the richness. A pinch of sea salt and a grind of black pepper finish the seasoning, but the real magic is in the dried oregano—its earthy, piney notes echo the Mediterranean coast. If you love a little heat, sprinkle a pinch of red‑pepper flakes over the finished skewers.
Everything's prepped? Good. Let’s get into the real action—there’s a rhythm to assembling these skewers that feels almost meditative, and I promise you’ll love every second of it.
The Method — Step by Step
Start by heating your grill to a high, direct heat—about 450°F (230°C). While the grill warms, combine olive oil, lemon juice, minced garlic, oregano, and the splash of white wine in a shallow bowl. Whisk vigorously until the mixture emulsifies; this will become your glaze that coats each bite with buttery‑bright flavor. Tip: The moment the grill starts to hiss is the moment you know you’re ready to sizzle.
While the grill is heating, cut the halloumi into 1‑inch cubes. Toss the cubes in half of the glaze, ensuring each piece is lightly coated but not swimming. Let them sit for five minutes; this short marination allows the cheese to absorb just enough acidity without becoming soggy.
Kitchen Hack: Pat the halloumi cubes dry with a paper towel before marinating; this prevents excess moisture from interfering with the sear.Next, prep the vegetables. Slice the bell peppers into bite‑sized chunks, cut the zucchini into half‑moons, quarter the red onion, and leave the cherry tomatoes whole. Toss all the veggies in the remaining glaze, making sure each piece gets a glossy coating. This step is crucial because the glaze not only flavors but also helps prevent sticking on the grill.
Now comes the assembly—this is where the fun part begins. Take a soaked wooden skewer and thread a piece of halloumi, followed by a pepper chunk, a zucchini slice, a tomato, and an onion piece. Repeat the pattern until the skewer is full, leaving a little space at the ends for easy turning. Aim for a balanced visual: colors should alternate like a painter’s palette.
Place the assembled skewers on the hot grill, laying them perpendicular to the grates to create those coveted grill marks. Close the lid and let them sear for about 2‑3 minutes per side. You’ll hear a satisfying sizzle that signals the cheese is forming a golden crust.
Kitchen Hack: Use tongs to rotate the skewers gently; this prevents the cheese from sliding off while ensuring an even char.After the first flip, brush the skewers with a fresh drizzle of the remaining glaze. This adds a glossy finish and reinforces the lemon‑herb flavor that may have evaporated during the initial sear. Keep an eye on the halloumi; when the edges start pulling away from the cheese block and turn a deep amber, you’ve reached perfection.
Watch out for flare‑ups! The oil in the glaze can cause occasional sparks, especially when the tomatoes burst. Move the skewers to a cooler part of the grill if the flames get too aggressive.
Watch Out: If the halloumi starts to brown too quickly, lower the heat slightly or lift the skewers to indirect heat to avoid a burnt exterior.Once all sides are beautifully charred—typically after 8‑10 minutes total—remove the skewers from the grill. Transfer them to a serving platter and give them a final squeeze of fresh lemon juice. The citrus will brighten the smoky notes and make the cheese’s salty bite feel lighter.
Let the skewers rest for two minutes. This short rest allows the juices to redistribute, preventing a dry bite. While they rest, sprinkle a pinch of flaky sea salt and a grind of black pepper over the top for that final flavor punch.
Serve immediately with a side of warm pita, a dollop of tzatziki, or a simple mixed green salad. The combination of textures and flavors makes this dish a crowd‑pleaser that can stand alone as a main or shine as a starter. That sizzle when it hits the pan? Absolute perfection.
That's it — you did it. But hold on, I've got a few more tricks that'll take this to another level, because once you master the basics, the sky's the limit for flavor upgrades.
Insider Tricks for Flawless Results
The Temperature Rule Nobody Follows
Grilling at a blistering 450°F ensures a quick sear that locks in moisture. If you lower the heat, the halloumi will release water and become rubbery. I once tried a medium‑low setting because I was impatient, and the result was a sad, soggy mess that no one wanted to touch. Keep the grill hot, and you’ll get that coveted crust without overcooking the interior.
Why Your Nose Knows Best
Your sense of smell is a better timer than any kitchen gadget when it comes to grilling. When the halloumi starts to emit a nutty, toasted aroma, that’s the cue to flip. If you rely solely on a timer, you’ll miss the subtle shift from raw to caramelized. Trust that nose—if it smells like a summer garden after a rainstorm, you’re golden.
The 5‑Minute Rest That Changes Everything
Resting the skewers for just five minutes after grilling allows the cheese fibers to relax and the juices to settle. Skipping this step leaves the halloumi dry and the vegetables a bit too hot to bite. A short pause also lets the lemon juice meld with the warm cheese, creating a harmonious flavor bridge.
The Skewer Swap Secret
If you’re worried about wooden skewers burning, try metal ones. Metal conducts heat, giving a slightly different char pattern, but you’ll need to oil them heavily to prevent sticking. I once used metal skewers for a beach picnic; the result was a crispier exterior because the metal retained heat longer.
The Double‑Glaze Technique
Applying a second glaze halfway through cooking adds layers of flavor that stay on the surface rather than evaporating. The first glaze creates the base, while the second adds a glossy finish and a burst of fresh lemon right before serving. This trick is pure magic and turns a good skewer into an unforgettable one.
Creative Twists and Variations
This recipe is a playground. Here are some of my favorite ways to switch things up:
Mediterranean Medley
Swap the red onion for thinly sliced red cabbage, add a handful of Kalamata olives, and finish with a drizzle of tzatziki. The tangy yogurt sauce complements the halloumi’s salt, and the cabbage adds a crunchy, slightly bitter edge that balances the lemon.
Spicy Southwest
Replace oregano with smoked paprika and cumin, add jalapeño slices, and finish with a squeeze of lime instead of lemon. The smoky heat pairs surprisingly well with the cheese, turning the dish into a bold, fiesta‑ready starter.
Herb‑Infused Delight
Introduce fresh rosemary and thyme into the glaze, and add small rosemary sprigs between the halloumi cubes. The aromatic herbs infuse the cheese with an earthy perfume that makes each bite feel like a walk through a herb garden.
Sweet‑Heat Fusion
Add a glaze of honey mixed with a dash of sriracha, and toss in pineapple chunks alongside the peppers. The sweet‑heat combo creates a caramelized coating that caramelizes beautifully on the grill, delivering a tropical twist.
Vegan Swap
Replace halloumi with firm tofu marinated in the same lemon‑wine mixture, and use a plant‑based oil. The tofu will absorb the flavors and develop a satisfying crust, making this dish accessible for vegans without sacrificing the texture.
Storing and Bringing It Back to Life
Fridge Storage
Place cooled skewers in an airtight container with a thin layer of the leftover glaze. They’ll stay fresh for up to 3 days. When you’re ready to eat, reheat on a medium grill for 3‑4 minutes, brushing with a bit more glaze to revive the shine.
Freezer Friendly
If you want to batch‑cook, freeze the assembled but uncooked skewers on a tray first, then transfer them to a zip‑top bag. They’ll keep for up to 2 months. Thaw overnight in the fridge, then grill as usual—no loss in texture.
Best Reheating Method
For the ultimate reheated bite, preheat a grill or grill pan to medium‑high, add a splash of water to the pan (just enough to create steam), and cover for 2 minutes. The steam revives the halloumi’s squeak, while the grill marks stay crisp. This trick ensures the leftovers taste as fresh as the original.