I’m going to be blunt: the first time I tried to make a chocolate cheesecake, it turned out looking like a sad, flat pancake that even my dog wouldn’t sniff at. I was ready to toss the whole thing, but then a friend dared me to add a splash of hot cocoa mix and a dollop of marshmallow fluff. I laughed, I shrugged, and I threw those two “forbidden” ingredients into the batter. The result? A dessert that made my oven sigh with pride and my taste buds throw a party that lasted all night. This is the moment that sparked the birth of the Hot Cocoa Cheesecake with Marshmallow Whipped Cream Delight, a dessert that takes the classic New York style and drapes it in a cozy, winter‑time blanket of cocoa and clouds.
Picture this: the kitchen is humming with the low thrum of the fridge, the timer clicks like a metronome, and the air is suddenly thick with the scent of melted chocolate mingling with the sweet, airy perfume of marshmallows. You can hear the faint crackle of the oven’s heating elements, feel the warm draft on your cheek, and see the glossy, chocolate‑streaked batter swirl like a midnight river. When the cheesecake finally rises, the edges pull away from the pan with a gentle, confident sigh, and the top shimmers with a glossy sheen that beckons you to dive in. The first bite? It’s a velvet‑soft, cocoa‑kissed cloud that melts into a buttery, tangy cream, followed by a burst of marshmallow whipped cream that’s light enough to float off your spoon.
Why does this version stand out from every other chocolate cheesecake you’ve seen on Pinterest? Most recipes either drown the cheese in cocoa, turning it into a dense brownie, or they sprinkle cocoa on top, leaving the flavor superficial. I’ve cracked the code by folding the cocoa mix directly into the creamy filling, letting the chocolate seep into every pore while preserving that signature cheesecake silkiness. Then, I crown it with a marshmallow‑infused whipped cream that’s airy, sweet, and just a tad salty—think of it as a fluffy snowdrift perched atop a molten lava cake. The contrast between the dense, rich base and the light, airy topping is the culinary equivalent of a perfectly timed punchline.
But wait—there’s a secret weapon I’m about to reveal that most recipes completely overlook: the humble chocolate cookie crust. Instead of a plain graham cracker base, I use a pre‑made chocolate cookie crust that adds an extra layer of crunch, a hint of buttery richness, and a subtle cocoa echo that ties the whole dessert together. This is the game‑changer that takes the cheesecake from good to legendary. Okay, ready for the game‑changer? Let me walk you through every single step — by the end, you’ll wonder how you ever made it any other way.
What Makes This Version Stand Out
- Depth of Flavor: By integrating a full‑package of hot cocoa mix into the filling, the chocolate flavor isn’t just a surface coating; it permeates the entire cheesecake, creating a deep, comforting cocoa undertone that feels like a warm hug.
- Texture Harmony: The creamy, dense cheesecake meets a crisp chocolate cookie crust and a cloud‑like marshmallow whipped cream, delivering three distinct textures that play off each other in every bite.
- Simplicity Meets Sophistication: Despite the layered flavors, the ingredient list is short and the steps are straightforward—no need for tempering chocolate or making a separate ganache.
- Unexpected Star: Marshmallow fluff and mini marshmallows aren’t just garnish; they become an integral part of the whipped cream, adding a subtle chew and a sweet aroma that elevates the whole dessert.
- Crowd‑Pleaser: Whether you’re serving a family dinner or a holiday party, this cheesecake earns applause. I dare you to taste this and not go back for seconds.
- Make‑Ahead Magic: The cheesecake can be baked a day ahead, and the marshmallow whipped cream can be whipped up just before serving, making it perfect for stress‑free entertaining.
- Ingredient Quality: Using a high‑quality chocolate cookie crust and real hot cocoa mix guarantees a rich, authentic chocolate flavor without artificial aftertaste.
- Visual Wow Factor: The glossy, chocolate‑streaked top topped with fluffy white clouds of whipped cream looks as good as it tastes, making it Instagram‑ready without any extra effort.
Inside the Ingredient List
The Flavor Base
The star of this cheesecake is the 16 oz cream cheese. This is the backbone that provides the silky, tangy canvas for every other flavor to dance on. If you skimp on the cream cheese or use a low‑fat version, you’ll lose that luxurious mouthfeel and end up with a crumbly, dry texture. For the best result, choose a full‑fat, room‑temperature cream cheese; it blends smoothly without lumps. A quick tip: cut the cheese into cubes before mixing—it speeds up the process and ensures an even, lump‑free batter.
The Sweet Symphony
Next up, 1 cup granulated sugar balances the tang of the cheese and the bitterness of the cocoa. Sugar is also a crucial player in the structure, helping the cheesecake set properly during the bake. If you prefer a less sweet version, you can shave off a tablespoon, but don’t go below ¾ cup or the texture will suffer. For a deeper caramel note, try swapping half the granulated sugar for brown sugar—just remember it will add a slight molasses flavor.
The Velvet Lift
3 large eggs act as the binder that gives the cheesecake its lift and firmness. They also introduce a subtle richness that complements the cocoa. Over‑beating the eggs can incorporate too much air, leading to cracks, so whisk them just until blended. If you’re allergic to eggs, a mixture of ¼ cup silken tofu plus 1 tbsp lemon juice works as a decent substitute, though the texture will be marginally softer.
The Creamy Counterpoint
1 cup sour cream adds a gentle tang and a silky finish. It also helps prevent the cheesecake from becoming overly dense. Full‑fat sour cream is non‑negotiable; low‑fat versions will make the filling too watery. When you fold the sour cream in, do it gently—this preserves the airy structure you built with the eggs.
The Flavor Amplifier
1 tsp vanilla extract is the quiet hero that rounds out the chocolate flavor, preventing it from feeling sharp. A splash of high‑quality pure vanilla does wonders; artificial vanilla can leave a metallic aftertaste. If you’re feeling adventurous, swap half the vanilla for a dash of almond extract for a subtle nutty undertone.
The Chocolate Catalyst
1 pkg hot cocoa mix is where the magic truly happens. This isn’t just cocoa powder; it contains sugar, milk solids, and a blend of spices that give the cheesecake its signature warm, comforting flavor. Use a mix you love to drink—if you prefer a darker, less sweet cocoa, go for a premium brand. Skipping this ingredient would turn the dessert into a plain cheesecake, and we’re not about that.
The Crunch Foundation
1 pkg chocolate cookie crust replaces the usual graham cracker base, adding a deep cocoa crunch that echoes the filling. Look for a pre‑made crust that’s about 9‑inch in diameter; it saves time and guarantees even baking. If you can’t find a chocolate cookie crust, crush chocolate wafer cookies and press them into the pan with a bit of melted butter for a DIY version.
The Fluff Factor
1 cup marshmallow fluff is folded into the whipped cream to create that cloud‑like topping. It adds sweetness and stabilizes the cream, preventing it from weeping. Be sure to use a brand that’s thick and glossy; cheap versions can become runny when whipped. For a dairy‑free twist, substitute with coconut‑based marshmallow fluff.
The Textural Surprise
1 cup mini marshmallows are sprinkled on top of the whipped cream just before serving. They give a delightful bite and a subtle toasted flavor when they melt slightly against the warm cheesecake. If you prefer a crunchier topping, toast the mini marshmallows under a broiler for 30 seconds—watch closely, they can go from golden to burnt in a heartbeat.
The Finishing Touch
1 oz chocolate shavings are used as a garnish, adding a visual sparkle and a burst of intense chocolate when you bite through the whipped cream. Use a vegetable peeler on a solid block of bittersweet chocolate for the most elegant shavings. If you want extra flair, drizzle a thin ribbon of melted chocolate over the shavings for a glossy finish.
Everything’s prepped? Good. Let’s get into the real action…

The Method — Step by Step
Preheat your oven to 325°F (163°C). While the oven warms up, place the chocolate cookie crust on a 9‑inch springform pan. Press it firmly into the bottom and up the sides, making sure there are no gaps. This crust will act as a sturdy foundation that won’t sog—watch out for any cracks; a small amount of melted butter brushed over the crust helps seal it.
In a large mixing bowl, beat the softened cream cheese on medium speed until it’s smooth and creamy, about 2‑3 minutes. Scrape down the sides to avoid streaks. The mixture should be glossy, not grainy—if you hear a faint squeak, you’re on the right track. Add the granulated sugar and continue beating until fully incorporated, which should take another 2 minutes.
Add the hot cocoa mix to the bowl and beat on low until the cocoa is completely blended, about 30 seconds. You’ll notice the batter turning a deep, rich brown—like a midnight sky. Then, add the vanilla extract and give it another quick stir. This step is pure magic; the cocoa infuses the cheese without compromising its silkiness.
Crack the eggs into a separate bowl, beat them lightly, then gradually pour them into the cheesecake mixture while the mixer is on low. This prevents the batter from curdling. The batter should look glossy and slightly thick—think of a thick milkshake. Once combined, fold in the sour cream gently; you’ll see the batter become even smoother, like satin.
Pour the filling over the prepared crust, smoothing the top with a spatula. Tap the springform pan lightly on the counter three times to release any air bubbles. The surface should be level, with a faint sheen. Place the pan on a larger roasting pan and pour hot water into the outer pan until it reaches halfway up the sides of the springform—this water bath (bain‑marie) ensures gentle, even cooking and prevents cracks.
Bake for 35‑40 minutes, or until the edges are set and the center still has a slight wobble when you jiggle the pan. The top should look matte, not browned. If you notice the top darkening too quickly, tent it loosely with foil. Remember: the cheesecake continues to set as it cools, so don’t over‑bake.
When the bake is done, turn off the oven, crack the door open just a crack, and let the cheesecake sit inside for 1 hour. This gradual cooling prevents a sudden temperature shock. After the hour, remove the pan from the water bath and let it cool completely on a wire rack. Then, refrigerate for at least 4 hours—or overnight for best results. The longer it chills, the firmer and more flavorful it becomes.
While the cheesecake is chilling, whip the marshmallow fluff and mini marshmallows. In a chilled mixing bowl, combine the marshmallow fluff with 1 cup heavy cream (you can use the same amount of whipped topping if you prefer) and beat on high speed until soft peaks form. Fold in the mini marshmallows gently. The mixture should double in volume and look like fluffy white clouds.
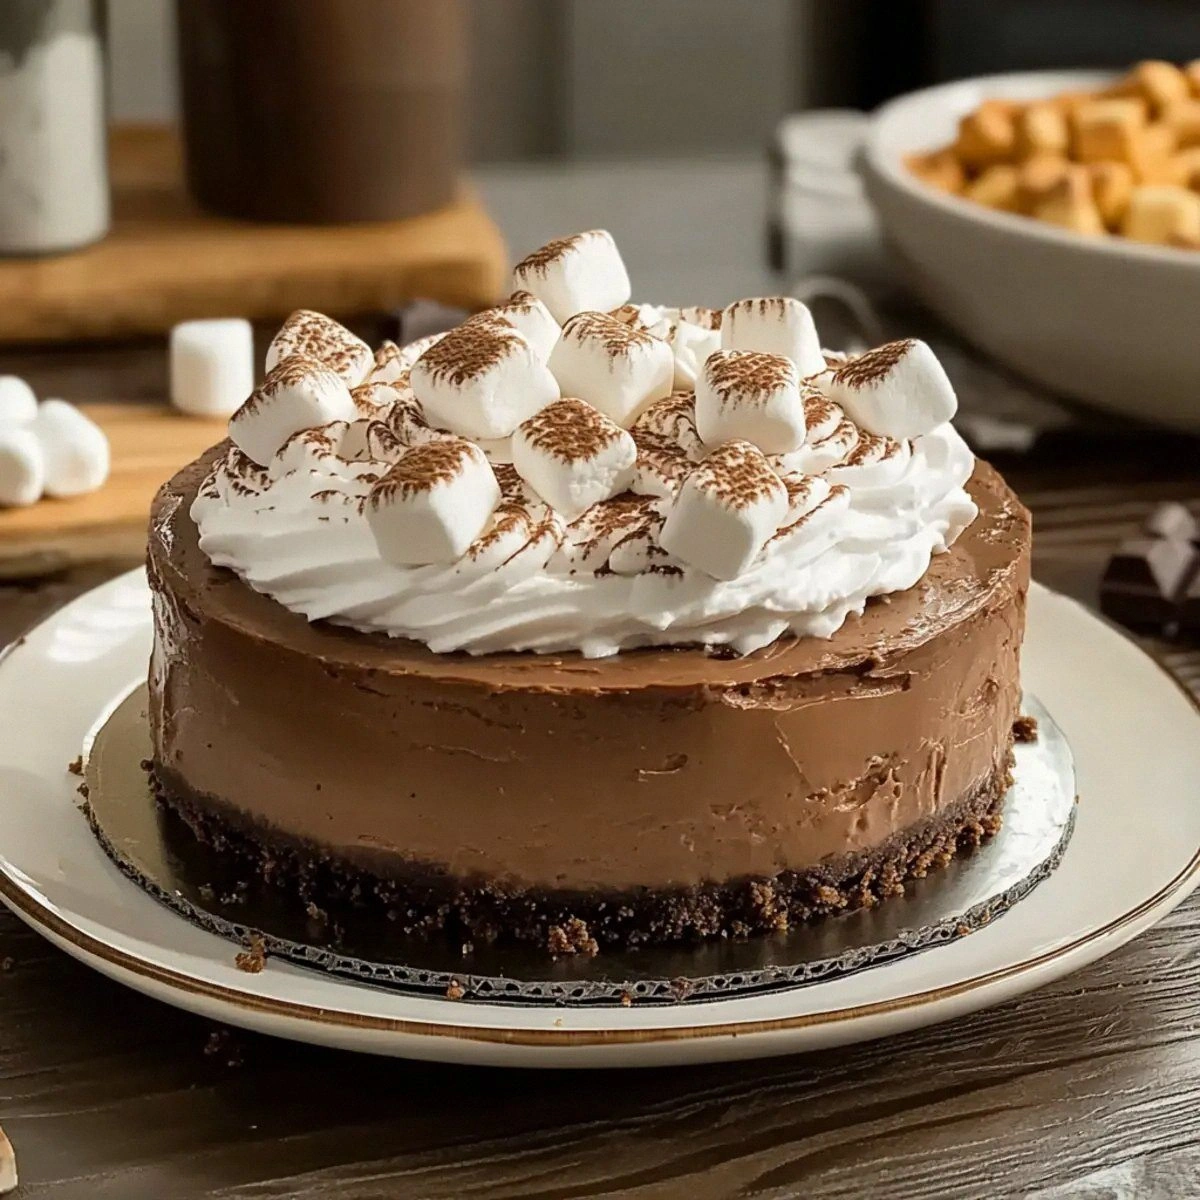
When you’re ready to serve, release the springform pan and place the cheesecake on a serving platter. Pipe or spread the marshmallow whipped cream over the top, creating a generous, cloud‑like dome. Sprinkle the chocolate shavings evenly, then scatter the remaining mini marshmallows for texture. The final look should be a glossy chocolate canvas crowned with a snowy peak—pure visual delight.
Slice with a hot, wet knife for clean cuts. Serve each slice with a drizzle of chocolate sauce if you like extra decadence. And now the fun part—watch your guests’ faces light up as they dig into that perfect blend of cocoa, cheese, and marshmallow magic. That sizzle when it hits the pan? Absolute perfection.
That’s it — you did it. But hold on, I’ve got a few more tricks that’ll take this to another level…
Insider Tricks for Flawless Results
The Temperature Rule Nobody Follows
Never start with cold cream cheese. Let it sit out for at least 30 minutes before mixing. The room‑temperature cheese blends without creating lumps, and it reduces the risk of a grainy texture. If you’re in a rush, cut the cheese into small cubes and microwave for 10 seconds—just enough to soften without melting.
Why Your Nose Knows Best
When the cheesecake is baking, trust your sense of smell. You’ll notice a sweet, toasty aroma when the edges are set and the center is still a bit jiggly. If the scent turns slightly burnt, pop the foil over the top immediately. Your nose is a more reliable timer than any digital device for this delicate bake.
The 5‑Minute Rest That Changes Everything
After removing the cheesecake from the oven, let it sit in the turned‑off oven with the door cracked for exactly 5 minutes. This tiny rest period lets the residual heat finish the setting process without shocking the batter. Skipping this step often leads to a cracked surface, which is a visual nightmare.
Marshmallow Whip Without a Mixer
If you don’t have an electric mixer, you can still achieve a fluffy marshmallow topping. Use a whisk and a large, cold metal bowl; beat vigorously for about 5 minutes. It’s a workout, but the result is worth the arm‑toning session. My friend once tried this and ended up with a perfect peak—proof that dedication beats gadgets.
The Secret Chill
Before serving, chill the plated cheesecake for 10 minutes in the fridge. This final chill firms the topping just enough so it doesn’t slide off when you slice, while still keeping the interior creamy. It’s a tiny step that makes a massive difference in presentation.
Garnish Like a Pro
When sprinkling chocolate shavings, do it over a large plate and use a gentle shaking motion. This creates an even dusting rather than clumps. For an extra touch, add a pinch of sea salt on top of the whipped cream—this contrast amplifies the chocolate flavor and balances the sweetness.
Creative Twists and Variations
This recipe is a playground. Here are some of my favorite ways to switch things up:
Peppermint Blizzard
Add ½ tsp peppermint extract to the filling and garnish with crushed candy canes instead of chocolate shavings. The mint cuts through the richness, making it perfect for holiday gatherings.
Espresso Explosion
Replace half of the hot cocoa mix with instant espresso powder. Top with a dusting of cocoa and a few coffee beans for an adult‑only twist that feels like a dessert and a caffeine boost in one.
White Chocolate Dream
Swap the chocolate cookie crust for a white chocolate graham cracker crust, and use white chocolate chips in the filling. Finish with white chocolate curls instead of dark shavings for a pastel‑perfect version.
Nutty Crunch
Fold in ½ cup toasted chopped hazelnuts or pecans into the filling before baking. The nuts add a buttery crunch that contrasts beautifully with the marshmallow fluff.
Berry Burst
Stir in ¼ cup raspberry puree into the batter for a subtle fruit note, and garnish with fresh raspberries on top of the whipped cream. The tartness brightens the deep chocolate flavor.
Vegan Velvet
Replace cream cheese with a vegan cream cheese alternative, use coconut cream instead of sour cream, and choose a dairy‑free marshmallow fluff. The result is a plant‑based version that still delivers that luxurious mouthfeel.
Storing and Bringing It Back to Life
Fridge Storage
Cover the cheesecake loosely with plastic wrap and store it in the refrigerator for up to 5 days. The texture stays creamy, and the flavors continue to meld, becoming even more harmonious over time.
Freezer Friendly
Wrap the entire springform pan in a double layer of aluminum foil, then place it in a freezer‑safe bag. Freeze for up to 2 months. When you’re ready to enjoy, transfer to the fridge to thaw overnight.
Best Reheating Method
Before serving a chilled slice, place the piece on a microwave‑safe plate, add a tiny splash (about 1 tbsp) of water around the edges, and microwave on low for 10‑15 seconds. The steam revives the creamy interior without cooking it further. Alternatively, let the slice sit at room temperature for 20 minutes for a softer bite.