I was in the middle of a Halloween party when my friend dared me to create a dessert that would make everyone scream with delight instead of terror. I stared at a bowl of plain vanilla ice cream, a bag of gummy worms, and a half‑finished batch of Oreo crumbs, and I thought, “What if I could turn this into a night‑time nightmare that tastes like a sweet dream?” The kitchen was a cacophony of clinking glasses, spooky music, and the faint hiss of a candle flame that seemed to whisper, “You can’t mess this up.” Yet, as the night grew darker, my cravings grew louder, and I realized I needed something that would hit every sense like a full‑moon howl.
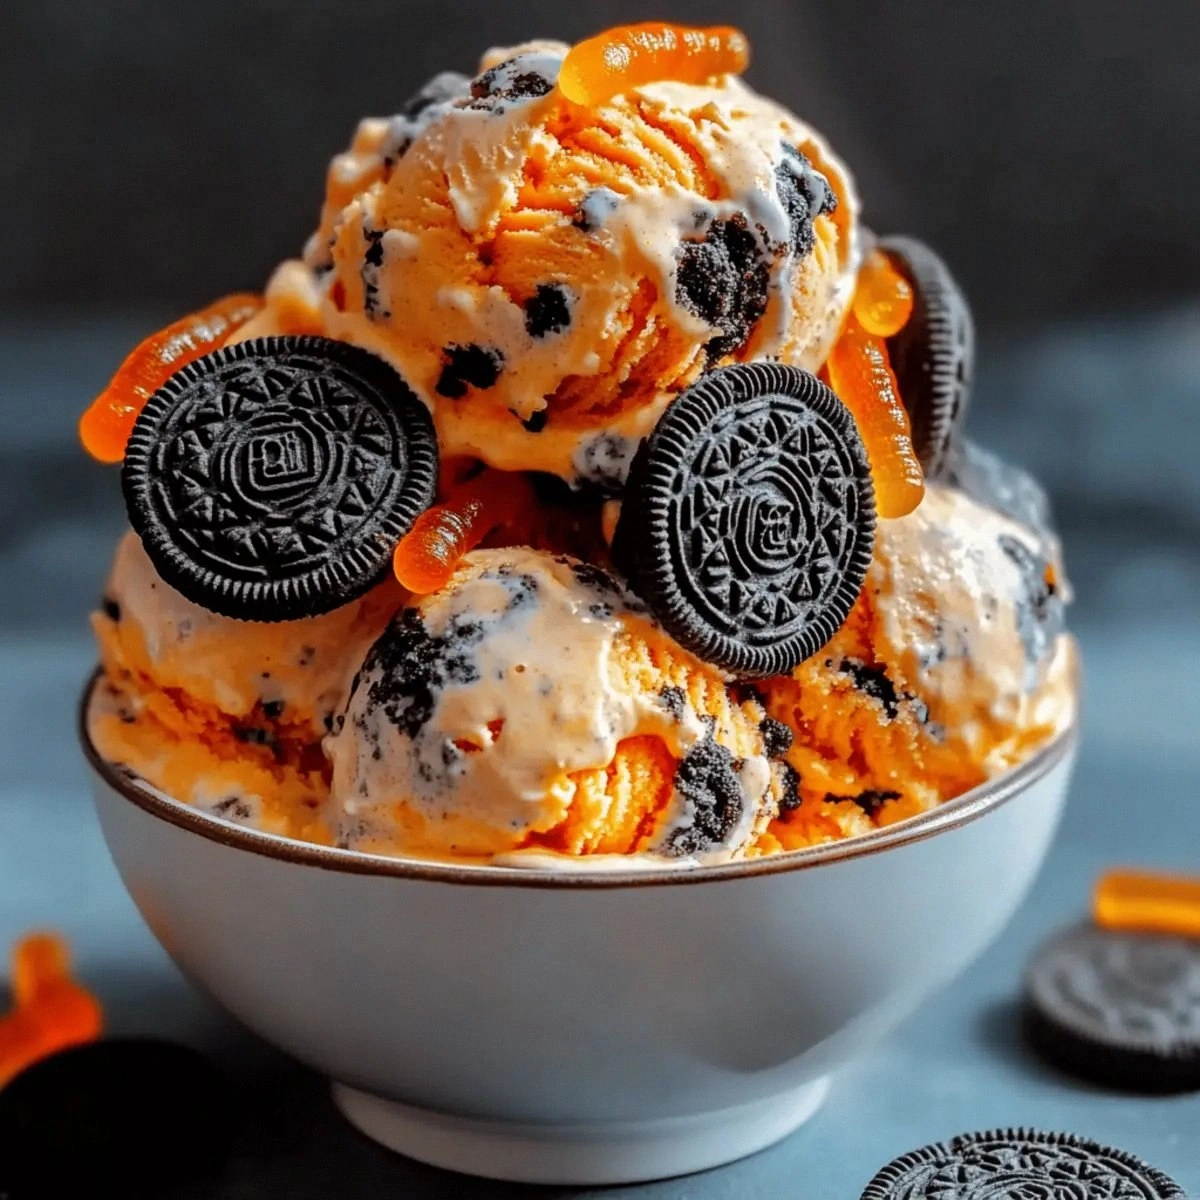
Picture this: the orange‑tinged swirl of ice cream glistening under a dim chandelier, the faint aroma of vanilla mingling with the sugary perfume of crushed cookies, and the subtle, almost metallic snap of gummy worms as you bite into them. The texture is a silky, buttery cloud that melts on your tongue while the crunchy Oreo shards give you a satisfying crunch that feels like stepping on crisp autumn leaves. The sound of the ice cream churner whirring is like a haunted wind, and the coolness on your fingertips feels like a phantom’s breath. All of that together makes the experience feel like you’ve stepped into a haunted house made entirely of dessert.
Most Halloween ice cream recipes either drown you in artificial food coloring or rely on cheap candy that melts into a sugary sludge. I’ve tried those, and let me be honest — I ate half the batch before anyone else got a spoonful because it was that good. This version, however, uses a simple base of heavy whipping cream and sweetened condensed milk, which creates a custardy richness you won’t find in store‑bought mixes. The orange gel coloring gives it a spooky hue without the chemical aftertaste, and the gummy worms are the perfect gummy “eyeballs” that stay chewy even when frozen. I dare you to taste this and not go back for seconds.
Okay, ready for the game‑changer? The secret weapon is a quick “freeze‑and‑crush” technique that locks the Oreo crumbs into the ice cream before they have a chance to become soggy. This tiny step makes the cookie pieces stay crisp, delivering that perfect contrast between smooth and crunchy. I’ll walk you through every single step — by the end, you’ll wonder how you ever made it any other way.
What Makes This Version Stand Out
- Flavor Depth: The combination of heavy cream and sweetened condensed milk creates a caramel‑like richness that feels like a midnight treat for your palate.
- Texture Harmony: Creamy, buttery ice cream meets crunchy Oreo shards and chewy gummy worms, delivering a multi‑layered mouthfeel that keeps you coming back.
- Simplicity: No fancy equipment, no tempering chocolate, just a handful of pantry staples and a standard ice cream maker.
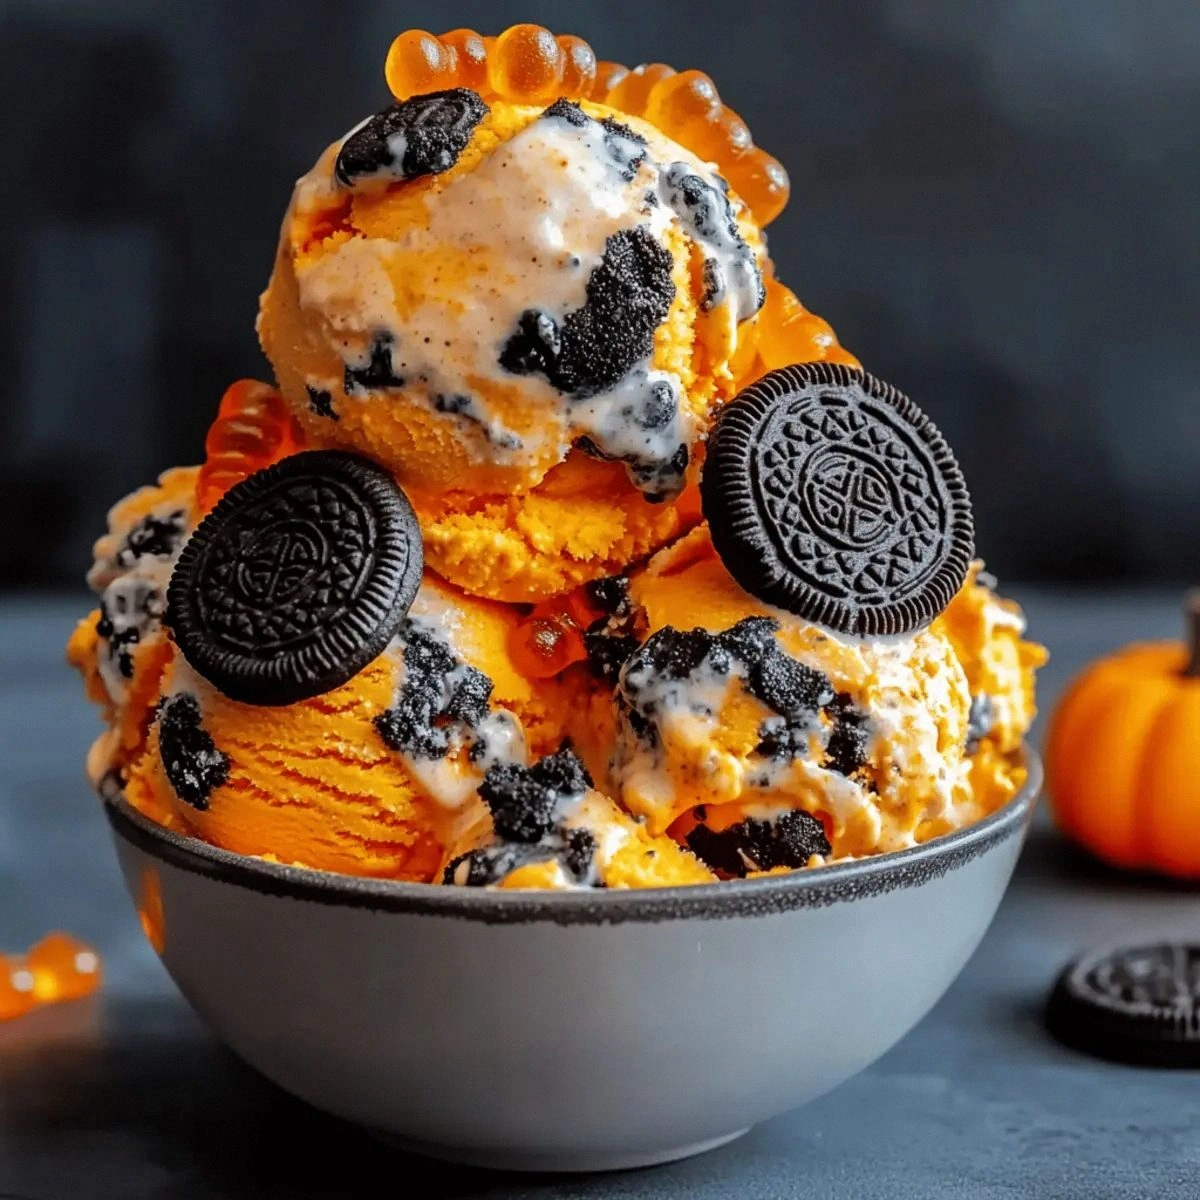
- Visual Impact: The orange gel coloring gives a haunting glow that looks spectacular in a clear glass bowl or a spooky serving dish.
- Crowd Reaction: Guests have called it “the best Halloween dessert ever” and have begged for the recipe, proving it works as a party centerpiece.
- Ingredient Quality: Using premium heavy whipping cream makes the base velvety, while real Oreo cookies keep the flavor authentic.
- Method Magic: The “freeze‑and‑crush” step ensures the cookies stay crunchy, a detail most recipes overlook.
- Make‑Ahead Potential: This ice cream can be prepared a day ahead, allowing the flavors to meld while you focus on other Halloween prep.
Alright, let's break down exactly what goes into this masterpiece...
Inside the Ingredient List
The Flavor Base
Heavy whipping cream is the backbone of this ice cream. Its high butterfat content creates that luxurious mouthfeel that cheap milk just can’t achieve. If you skimp on the cream, you’ll end up with a watery, bland texture that feels more like a milkshake than a true frozen dessert. For the best result, choose a brand that lists “cream” as the first ingredient and avoid ultra‑pasteurized versions that can sometimes taste flat. A good swap if you’re dairy‑free is coconut cream, but expect a subtle coconut flavor to emerge.
Sweetened condensed milk adds the perfect amount of sugar and a hint of caramelized milk flavor. It also stabilizes the mixture, reducing ice crystal formation during the freeze. If you’re watching sugar, you can substitute a low‑sugar condensed milk, though the texture will be a tad less creamy. When buying, look for the classic glass jar; it’s often richer than the canned version.
The Texture Crew
Crushed Oreo cookies are the crunchy surprise that turns each bite into a mini adventure. The chocolate wafer and creamy filling create a delightful contrast with the silky ice cream. If you forget to crush them finely enough, you’ll get large cookie chunks that can dominate the flavor; too fine, and they’ll melt into the base, losing that satisfying crunch. For a gluten‑free version, use gluten‑free chocolate sandwich cookies that mimic the Oreo profile.
Gummy worms are the spooky garnish that stays chewy even when frozen. Their bright colors and playful shape make them perfect for Halloween, and they add a burst of fruity sweetness that balances the richness of the cream. If you’re allergic to gelatin, try fruit leather strips cut into worm shapes; they’ll still give you that chewy texture.
The Unexpected Star
Orange gel food coloring is the secret that turns a regular ice cream into a Halloween showstopper. Unlike liquid dyes, gel coloring doesn’t dilute the mixture, preserving the creamy consistency. Just five drops are enough to achieve a deep, pumpkin‑orange hue that looks eerie under dim lighting. If you want a more natural approach, try a pinch of pumpkin puree and a dash of turmeric; the color won’t be as vivid, but the flavor will get an extra autumnal twist.
The Final Flourish
Vanilla extract ties everything together with its warm, aromatic backbone. It amplifies the sweetness without overpowering the other flavors, ensuring each spoonful feels balanced. Use a high‑quality pure vanilla extract for the best flavor; imitation vanilla can taste flat and leave a chemical aftertaste. If you’re a fan of spice, a pinch of ground cinnamon or nutmeg can add a subtle autumnal note.
Everything's prepped? Good. Let's get into the real action...
The Method — Step by Step
First, combine the heavy whipping cream and sweetened condensed milk in a large mixing bowl. Use a whisk to blend them until the mixture is smooth and glossy, like a moonlit lake. Pro tip: Let the mixture sit for a minute; this allows any tiny bubbles to rise, giving you a smoother final product. The aroma should be sweet and buttery, a scent that already hints at the decadence to come.
Add the vanilla extract and orange gel food coloring. Start with five drops, then swirl with a spatula until the color is evenly distributed. The mixture should turn a deep, pumpkin‑orange that looks almost supernatural in the light. This next part? Pure magic. Taste a tiny spoonful; you’ll notice a subtle vanilla backdrop that’s about to be amplified by the other ingredients.
Cover the bowl with plastic wrap and place it in the freezer for 30 minutes. This quick chill step helps the churner work more efficiently and prevents ice crystals from forming later.
Kitchen Hack: While the base chills, line a baking sheet with parchment and spread the crushed Oreo cookies in a thin layer; freeze them for 15 minutes so they stay crunchy when folded in.Meanwhile, prepare the gummy worms. Pat them dry with a paper towel to remove any surface moisture that could cause freezer burn. If you like extra flavor, toss them lightly in a pinch of powdered sugar; this creates a subtle glaze that glistens when the ice cream is served.
Remove the chilled cream mixture from the freezer and pour it into your ice cream maker. Turn the machine on and let it churn for about 20‑25 minutes, or until it reaches a soft‑serve consistency. You’ll hear a steady hum that feels like a haunted lullaby, and the mixture will thicken, pulling away from the sides of the bowl.
When the churn is almost done, sprinkle the frozen Oreo crumbs over the surface. Using a rubber spatula, fold them in gently, allowing the crumbs to stay in distinct pockets rather than dissolving completely.
Watch Out: If you add the cookies too early, they’ll absorb moisture and become mushy, ruining the crunchy surprise.Finally, fold in the gummy worms, distributing them evenly throughout the mixture. The worms should stay whole, giving each bite a playful “wiggle” that feels like a tiny, edible ghost. At this point, the ice cream should look like a bright orange swamp dotted with dark cookie islands and neon worms.
Transfer the churned ice cream to a freezer‑safe container, smoothing the top with a spatula. Press a piece of parchment paper directly onto the surface to prevent ice crystals from forming. Freeze for at least 3 hours, or until firm enough to scoop. I dare you to taste this and not go back for seconds. The longer it sits, the more the flavors meld, turning this into a truly haunting dessert.
When you’re ready to serve, let the ice cream sit at room temperature for 5 minutes. This softens the edges just enough to scoop without shattering the gummy worms. Serve in clear glass bowls or spooky pumpkin‑shaped dishes, and garnish with a few extra gummy worms perched on the rim for drama.
That's it — you did it. But hold on, I've got a few more tricks that'll take this to another level...
Insider Tricks for Flawless Results
The Temperature Rule Nobody Follows
Never start with a room‑temperature base. Cooling the cream mixture for at least 30 minutes before churning drops the initial temperature, meaning the ice cream will freeze faster and form fewer ice crystals. I once tried skipping this step, and the result was a grainy, icy mess that felt like chewing on snow. The rule of thumb: the colder the mixture, the smoother the final product.
Why Your Nose Knows Best
Your sense of smell is a secret ally in the kitchen. When the cream mixture is heating (if you ever decide to gently warm it for a flavor infusion), you’ll notice a sweet, buttery scent that signals it’s ready for the vanilla. If the aroma is faint, give it another minute; the flavor won’t develop fully otherwise. Trust your nose more than the clock.
The 5‑Minute Rest That Changes Everything
After churning, let the ice cream rest in the freezer for five minutes before adding the gummy worms. This short pause lets the base firm up just enough to hold the worms in place, preventing them from sinking to the bottom. A friend tried adding the worms immediately and ended up with a soggy bottom layer; a simple five‑minute wait saved the texture entirely.
Cookie Crunch Preservation
Freeze the crushed Oreo cookies before folding them in. This tiny step creates a barrier that stops the cookies from soaking up the cream, preserving their crunch for hours. I’ve seen recipes that blend the cookies directly into the base, resulting in a mushy, cookie‑laden paste that loses its textural appeal.
Gummy Worm Glaze
Lightly dust the gummy worms with powdered sugar before folding them in. The sugar creates a subtle glaze that catches the light, making the worms look like they’re coated in a sugary frost. It also adds a tiny extra snap when you bite, enhancing the overall mouthfeel.
Creative Twists and Variations
This recipe is a playground. Here are some of my favorite ways to switch things up:
Spooky Blackout
Swap the orange gel for black food coloring and add a teaspoon of activated charcoal powder. The result is a midnight‑black ice cream that looks like it was harvested from a witch’s cauldron. Pair with silvered chocolate shards for an extra eerie effect.
Pumpkin Spice Delight
Add a tablespoon of pumpkin puree and a pinch of cinnamon, nutmeg, and clove to the base before churning. The pumpkin adds a natural orange hue and a warm, autumnal flavor that pairs beautifully with the gummy worms.
Chocolate Graveyard
Replace the Oreo crumbs with crushed chocolate sandwich cookies and fold in chocolate-covered pretzel sticks. The salty‑sweet combo feels like a chocolate graveyard where each bite is a tombstone of flavor.
Fruit‑Infused Fright
Stir in a handful of fresh raspberries or blackberry purée after churning for a tangy contrast. The fruit’s acidity cuts through the richness, making the dessert feel lighter while still keeping the spooky vibe.
Vegan Nightmare
Swap the heavy cream for full‑fat coconut cream and use a vegan sweetened condensed milk alternative. Use dairy‑free cookie crumbs and vegan gummy worms to keep the texture intact. The coconut flavor adds an exotic twist that still feels festive.
Storing and Bringing It Back to Life
Fridge Storage
If you plan to serve the ice cream within 24 hours, keep it in an airtight container in the freezer. For a softer texture, move the container to the refrigerator for 20‑30 minutes before serving. This short thaw allows the gummy worms to stay pliable and the cookies to stay crunchy.
Freezer Friendly
The ice cream will keep well for up to two weeks when stored at 0°F (‑18°C). For best results, place a sheet of parchment paper on the surface before sealing the lid to prevent ice crystals. If you notice a thin icy layer forming, simply let the ice cream sit at room temperature for a few minutes and give it a quick stir.
Best Reheating Method
When you want to revive a hardened batch, place the container on a warm (not hot) countertop for 5 minutes, then stir in a splash of cold milk or a few drops of water. The added moisture creates steam that softens the ice cream without diluting the flavor, bringing it back to that perfect, scoop‑ready consistency.