Picture this: it’s a crisp Saturday morning in October, the kind where the wind whispers through the trees and the scent of fallen leaves hangs in the air. I was halfway through a marathon of pumpkin‑spice everything—latte, muffins, even a questionable pumpkin‑infused salsa—when a dare from my roommate hit me like a cold draft. “Make a cake that actually makes people *stop* scrolling,” she said, eyes gleaming with mischief. I laughed, grabbed the nearest pumpkin puree, and set out to create a cake that would make even the most hardened pumpkin‑hater bow down.
The kitchen quickly turned into a battlefield of clanging pans, the oven’s fan humming like a distant thunderstorm, and the sweet, earthy aroma of pumpkin swirling with butter and sugar. My hands were slick with honey as I whisked the frosting, and the batter looked like a golden sunrise trapped in a bowl. When the timer finally dinged, the cake rose with a confidence that would put a skyscraper to shame, its surface a glossy, caramel‑kissed crown. I dared you to taste this and not go back for seconds—seriously, I’m willing to bet you’ll be back before the frosting even sets.
Most pumpkin cake recipes either end up dry as old parchment or sweet as a candy store, missing that perfect balance of spice, moisture, and a frosting that’s both silky and subtly sweet. This version? Hands down the best you’ll ever make at home. It uses two batches of butter—one melted into the batter for that melt‑in‑your‑mouth crumb, the other creamed with cream cheese for a frosting that’s richer than a fall sunset. And the secret weapon? A splash of honey that adds depth without overpowering the pumpkin’s natural earthiness. If you’ve ever struggled with a crumbly pumpkin cake, you’re not alone—and I’ve got the fix.
But wait, there’s more. I’m about to reveal a technique that most recipes completely ignore: tempering the butter with a touch of hot water before mixing it into the batter. This little trick keeps the cake ultra‑moist and gives it a tender crumb that’s almost buttery‑cloud like. Okay, ready for the game‑changer? Let me walk you through every single step — by the end, you’ll wonder how you ever made it any other way.
What Makes This Version Stand Out
- Moisture: The double‑butter method locks in liquid, so each bite feels like a hug from a pumpkin‑spiced cloud.
- Flavor Depth: Honey in the frosting adds a floral sweetness that balances the spice without turning it cloying.
- Texture Harmony: The cake’s crumb is tender yet sturdy enough to hold the frosting without crumbling apart.
- Simplicity: Only eleven ingredients, all pantry‑friendly, yet the result feels like a bakery masterpiece.
- Crowd Reaction: I’ve watched entire families line up for seconds; this cake turns skeptics into believers.
- Ingredient Quality: Using real pumpkin puree (not the sugary mix) gives an authentic earthiness.
- Cooking Method: Baking at a moderate temperature ensures an even rise and caramelized edges.
- Make‑Ahead Potential: Frost the cake a day ahead, and the flavors meld into something even more magical.
Inside the Ingredient List
The Flavor Base
Pure Pumpkin Puree (15 oz can): This is the heart of the cake, providing natural sweetness, moisture, and that unmistakable autumnal flavor. If you skip it, you’ll end up with a bland, overly sweet batter that lacks depth. For the best results, choose a puree that’s 100 % pumpkin—no added sugars or spices. If fresh pumpkin is in season, roast and puree it yourself for an even richer taste.
Pumpkin Pie Spice (1 tbsp): A blend of cinnamon, nutmeg, ginger, and cloves, this spice mix turns a simple cake into a fragrant celebration. Too much can overwhelm, so measure carefully. If you love a spicier kick, add a pinch of ground cloves or a dash of all‑spice.
The Texture Crew
Unsalted Butter (½ cup for cake, ½ cup for frosting): The butter in the batter melts into a tender crumb, while the butter in the frosting creates a silky, spreadable finish. Using unsalted butter lets you control the salt level precisely. If you only have salted butter, cut back on the added salt by half.
All‑Purpose Flour (2 ½ cups): This provides the structure that holds the cake together. Over‑mixing can develop gluten, leading to a tougher texture, so blend just until combined. For a lighter crumb, you can sift the flour with the baking soda.
Baking Soda (2 tsp): The leavening agent that makes the cake rise and gives it that airy lift. Too much will cause a metallic aftertaste, while too little results in a dense cake. Measure with a level spoon for accuracy.
Granulated Sugar (1 ½ cups): Sugar not only sweetens but also helps create a tender crumb by inhibiting gluten formation. If you prefer a less sweet cake, you can reduce to 1 ¼ cups, but the texture may change slightly.
The Unexpected Star
Honey (¼ cup): This golden nectar adds a subtle floral note to the frosting, enhancing the pumpkin without stealing the spotlight. It also helps the frosting set with a glossy finish. If you’re allergic to honey, maple syrup works as a 1:1 substitute, though the flavor will shift toward maple.
Cream Cheese (8 oz): The tangy cream cheese balances the sweetness of the honey and sugar, creating a frosting that’s both rich and refreshing. Use full‑fat cream cheese for the best texture; low‑fat versions can become grainy.
The Final Flourish
Eggs (2 large): Eggs provide structure, moisture, and richness. Beating them lightly before adding to the batter ensures an even distribution. If you’re vegan, substitute each egg with ¼ cup unsweetened applesauce, but expect a slightly denser crumb.
Salt (½ tsp): A pinch of salt amplifies all the flavors, making the pumpkin and spices sing. Skipping salt can leave the cake tasting flat.
Everything's prepped? Good. Let's get into the real action...

The Method — Step by Step
Preheat your oven to 350°F (175°C) and position the rack in the middle. Grease a 9‑inch round cake pan with a thin layer of butter, then line the bottom with parchment paper. This double‑layer of protection ensures the cake releases cleanly—no stubborn sticking that ruins the presentation. As the oven warms, the kitchen fills with the faint scent of butter melting, a promise of the richness to come.
Kitchen Hack: Lightly dust the greased pan with flour, tapping out the excess; this creates a non‑stick barrier that’s perfect for delicate cakes.In a medium saucepan, melt ½ cup of butter over low heat. Once melted, whisk in ¼ cup of hot water—this is the tempering trick that keeps the butter from separating later. Remove from heat and let it cool just until it’s warm to the touch. Meanwhile, in a large bowl, whisk together the flour, baking soda, salt, and pumpkin pie spice. The dry mix should look like a speckled sandstorm, ready to absorb the wet ingredients.
In a separate bowl, beat the remaining ½ cup of butter with the granulated sugar until light and fluffy—about three minutes on medium speed. The mixture should turn a pale, creamy color, and you’ll hear a faint whisper of air bubbles as you beat. Add the eggs one at a time, beating well after each addition to incorporate them fully. Then stir in the pumpkin puree, letting its vibrant orange hue swirl into the batter.
Watch Out: When you combine the wet and dry mixtures, do it gently. Over‑mixing will develop gluten, resulting in a tough cake. Fold the flour mixture into the pumpkin batter using a spatula, turning the bowl over and over until just combined. The batter will be thick but glossy—think of a rich custard that’s just about to set.
Watch Out: If the batter looks too dry, add a tablespoon of milk; if too wet, sprinkle a little extra flour.Pour the batter into the prepared pan, smoothing the top with a rubber spatula. Tap the pan lightly on the counter three times to release any trapped air bubbles—those bubbles are the tiny pockets that will become the cake’s airy crumb. The surface should be level, with a subtle sheen from the butter. Pop the pan into the oven and bake for 30‑35 minutes, or until a toothpick inserted in the center comes out clean, with just a few moist crumbs clinging.
While the cake bakes, start the frosting. In a mixing bowl, combine the softened cream cheese and the remaining ½ cup of butter. Beat on medium speed until the mixture is smooth and pale. Add the honey and continue beating until the frosting is fluffy and glossy—this should take about two minutes. The honey’s aroma will start to mingle with the cream cheese, creating a sweet, fragrant perfume that fills the kitchen.
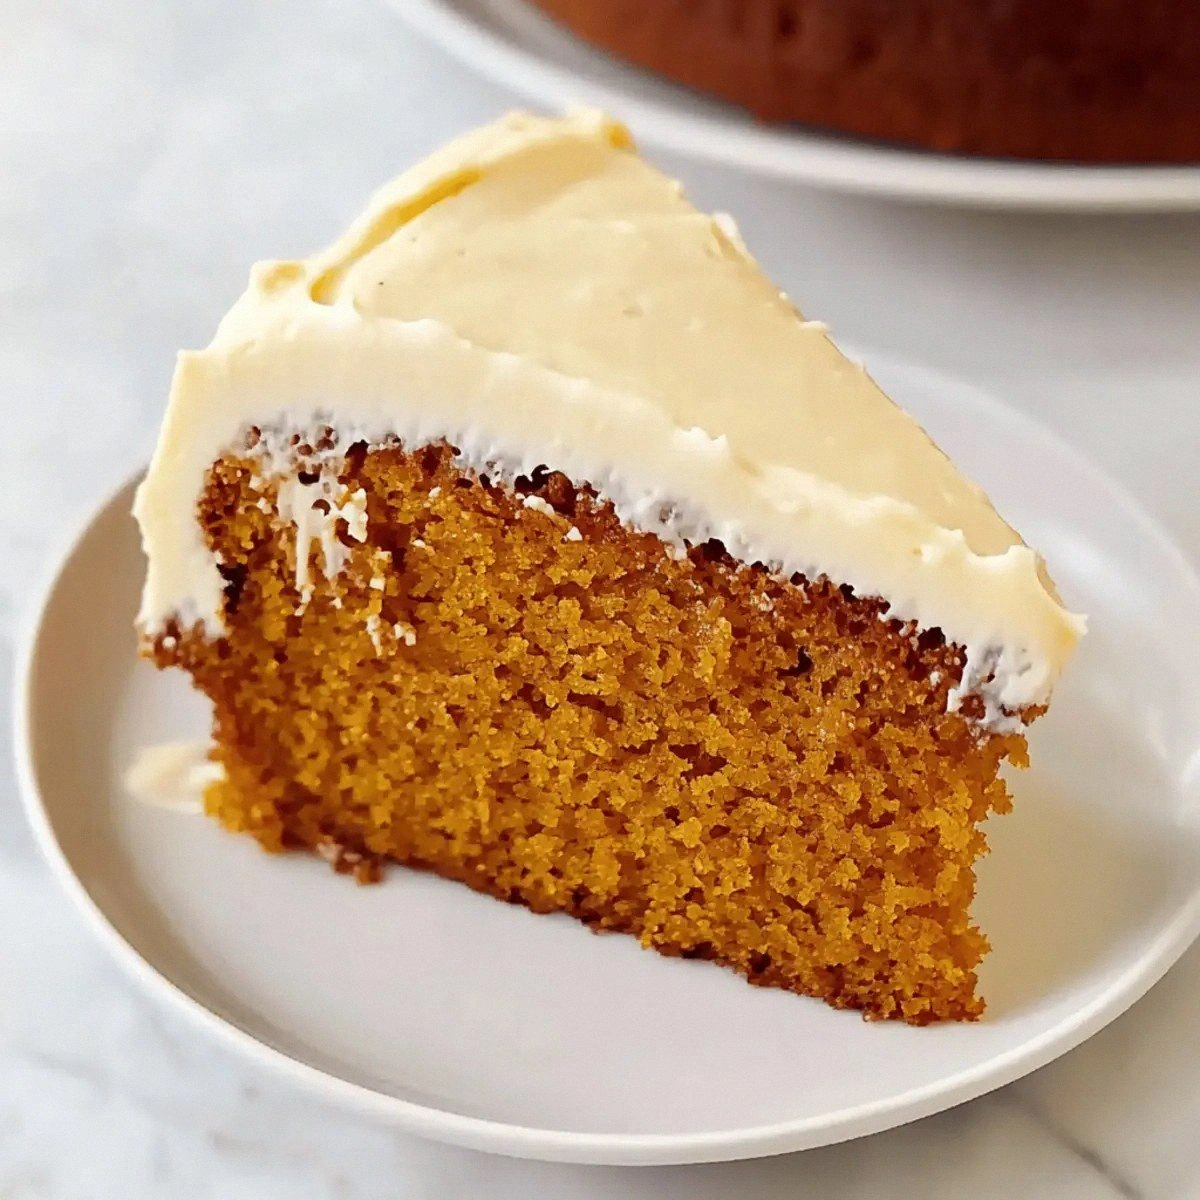
When the cake is done, let it cool in the pan for ten minutes, then run a thin knife around the edges to loosen it. Invert onto a wire rack and peel off the parchment paper. Allow the cake to cool completely before frosting—this prevents the frosting from melting into a sugary puddle.
Kitchen Hack: If you’re impatient, place the cake in the freezer for 10 minutes; it will firm up just enough to frost without cracking.Spread a thin “crumb coat” of frosting over the entire cake, just enough to seal in crumbs. Chill the crumb‑coated cake for 15 minutes—this step is pure magic because it creates a smooth canvas for the final layer. After chilling, apply a generous dollop of the honey‑cream cheese frosting, swirling it with an offset spatula for a rustic, bakery‑style finish. The frosting should glide like melted butter over warm toast, creating a glossy sheen.
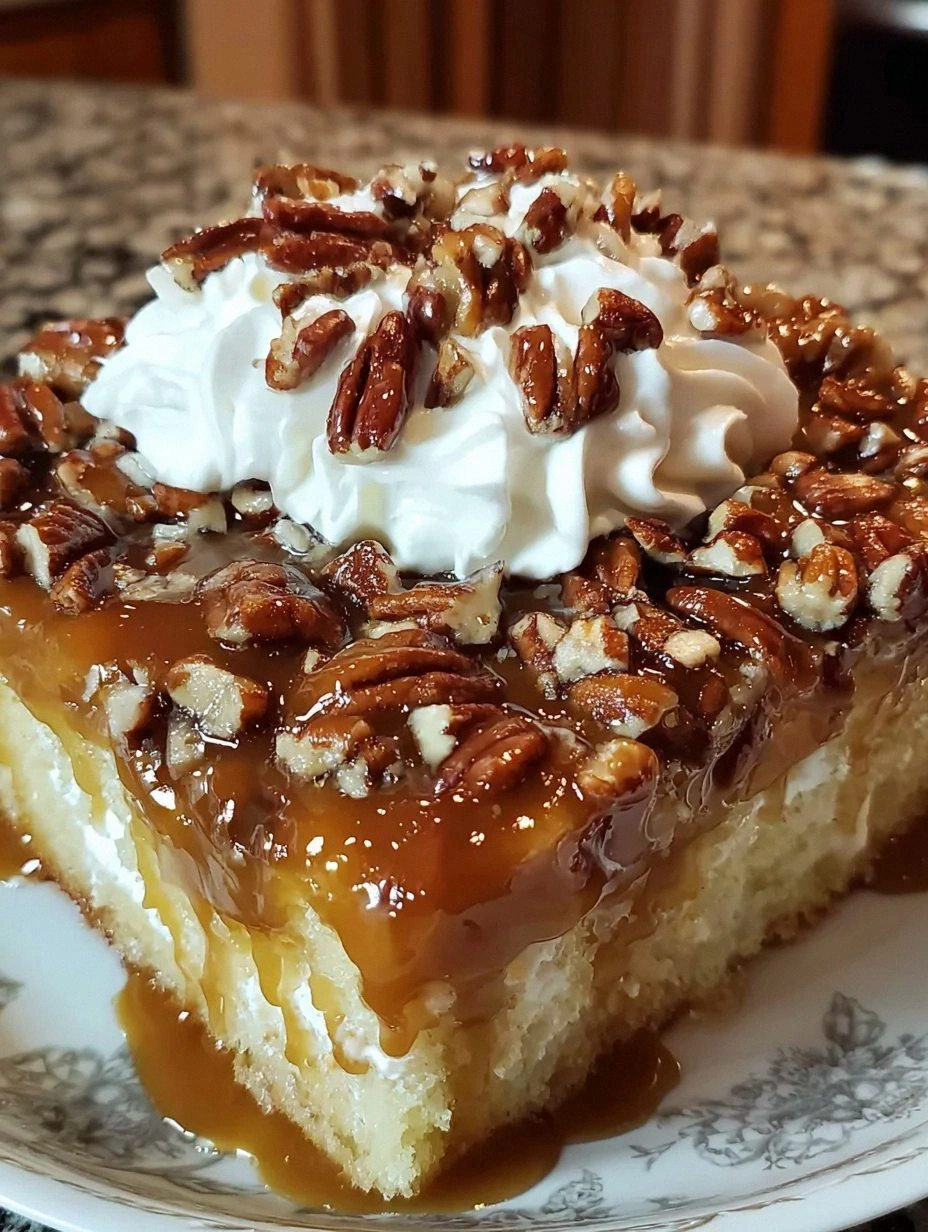
Finally, garnish with a light dusting of pumpkin pie spice or a drizzle of honey for extra sparkle. Slice with a hot, clean knife—hot water helps the knife glide cleanly through the moist crumb. Serve warm or at room temperature, and watch as your guests’ eyes widen with delight. That sizzle when it hits the pan? Absolute perfection.
That's it — you did it. But hold on, I've got a few more tricks that'll take this to another level...
Insider Tricks for Flawless Results
The Temperature Rule Nobody Follows
Never bake a pumpkin cake straight from a cold fridge. Let the batter sit at room temperature for ten minutes before you pour it into the pan. This tiny pause helps the leavening agents activate evenly, resulting in a uniform rise. I once tried to rush the process and ended up with a dome that cracked like a dried riverbed—lesson learned. Trust the rule, and your cake will have a flat, beautiful top every time.
Why Your Nose Knows Best
The moment the cake is ready to come out of the oven, it gives you a subtle cue: a sweet, caramel‑like aroma that starts to drift out of the vents. If you smell a faint hint of burnt sugar, the cake might be overcooked. Use your nose as a timer—when the scent hits that perfect “just‑baked” note, the cake is ready to be rescued from the heat.
The 5‑Minute Rest That Changes Everything
After frosting, let the cake rest for at least five minutes before slicing. This short rest lets the frosting set and the crumb settle, preventing crumbs from flying everywhere. I’ve seen impatient slicers end up with a mess of crumb‑confetti on their plates; a brief pause eliminates that disaster. Plus, the flavors meld during this time, making each bite more harmonious.
Butter Temperature Trick
When creaming butter for the frosting, start on low speed, then gradually increase. This prevents the butter from separating, ensuring a smooth, velvety texture. If you jump straight to high speed, the butter can split, leaving you with a grainy frosting that’s impossible to spread. The gradual increase is the secret behind that flawless, glossy finish.
Honey Integration Secret
Don’t add honey straight from the jar; warm it slightly in a microwave for ten seconds. Warm honey mixes more evenly with the cream cheese, eliminating any streaks. If you add cold honey, it can cause the frosting to seize, creating lumps that are impossible to smooth out. This tiny warming step is pure magic for a perfectly uniform frosting.
Creative Twists and Variations
This recipe is a playground. Here are some of my favorite ways to switch things up:
Maple‑Brown Sugar Swirl
Replace half the honey in the frosting with pure maple syrup and add a tablespoon of brown sugar. The result is a deeper, caramel‑like flavor that pairs beautifully with the pumpkin. Ideal for those who love a touch of maple in their fall desserts.
Spiced Walnut Crunch
Fold in ½ cup toasted, chopped walnuts and a pinch of ground cinnamon into the batter before baking. The walnuts add a satisfying crunch and a nutty undertone that contrasts the soft crumb. It’s perfect for texture lovers who crave a little bite.
Chocolate Drizzle Delight
After frosting, drizzle melted dark chocolate over the top and sprinkle a pinch of sea salt. The bitter chocolate cuts through the sweetness, while the salt amplifies the pumpkin’s flavor. This version feels like a sophisticated dessert for a dinner party.
Vegan Velvet
Swap the butter for coconut oil, use almond milk instead of dairy, and replace cream cheese with a vegan cream cheese alternative. The honey can be swapped with agave nectar. The texture remains moist, and the flavor stays true to the original—great for plant‑based guests.
Pumpkin Cheesecake Fusion
Blend an extra 4 oz of cream cheese into the batter for a denser, cheesecake‑like interior. Top with a thin layer of pumpkin puree before frosting for an extra burst of pumpkin flavor. This hybrid is a show‑stopper for anyone who loves both cake and cheesecake.
Storing and Bringing It Back to Life
Fridge Storage
Cover the cake loosely with foil or store it in an airtight container and keep it in the refrigerator for up to five days. The frosting stays fresh, and the cake retains its moisture. Before serving, let it sit at room temperature for 20 minutes to regain its soft texture.
Freezer Friendly
Wrap the unfrosted cake tightly in plastic wrap, then a layer of aluminum foil, and freeze for up to three months. When you’re ready to enjoy, thaw overnight in the fridge, then frost and serve. The frosting can also be frozen separately in a zip‑top bag for up to two months.
Best Reheating Method
To revive a slice, place it on a microwave‑safe plate, sprinkle a tiny splash of water around the edges, and microwave for 15‑20 seconds. The steam generated revives the crumb, making it taste as fresh as the day it was baked. Avoid over‑heating, or the frosting will melt.