I remember the night I tried to make my first batch of cinnamon knots and the kitchen turned into a disaster zone. The dough had a suspiciously rubbery texture, the filling looked like a dry dust, and the oven produced a flat, unappetizing loaf that seemed to have lost all its promise. I stared at the result, feeling a mix of disappointment and a strange, almost guilty excitement—because even in failure, there was a lesson waiting. That night, I swore to myself that I would find the ultimate recipe that would transform this simple comfort food into something unforgettable.
Fast forward to today, and I’m sitting in my kitchen with the aroma of fresh butter and warm cinnamon dancing in the air. I’ve experimented with dozens of variations, but this version—hand‑crafted, double‑dough, butter‑butter, and a glaze that glistens like sugar‑coated snow—has emerged as the definitive cinnamon knot. It’s not just a recipe; it’s a revelation that turns a humble snack into a showstopper. And trust me, once you taste these knots, I dare you to not go back for seconds.
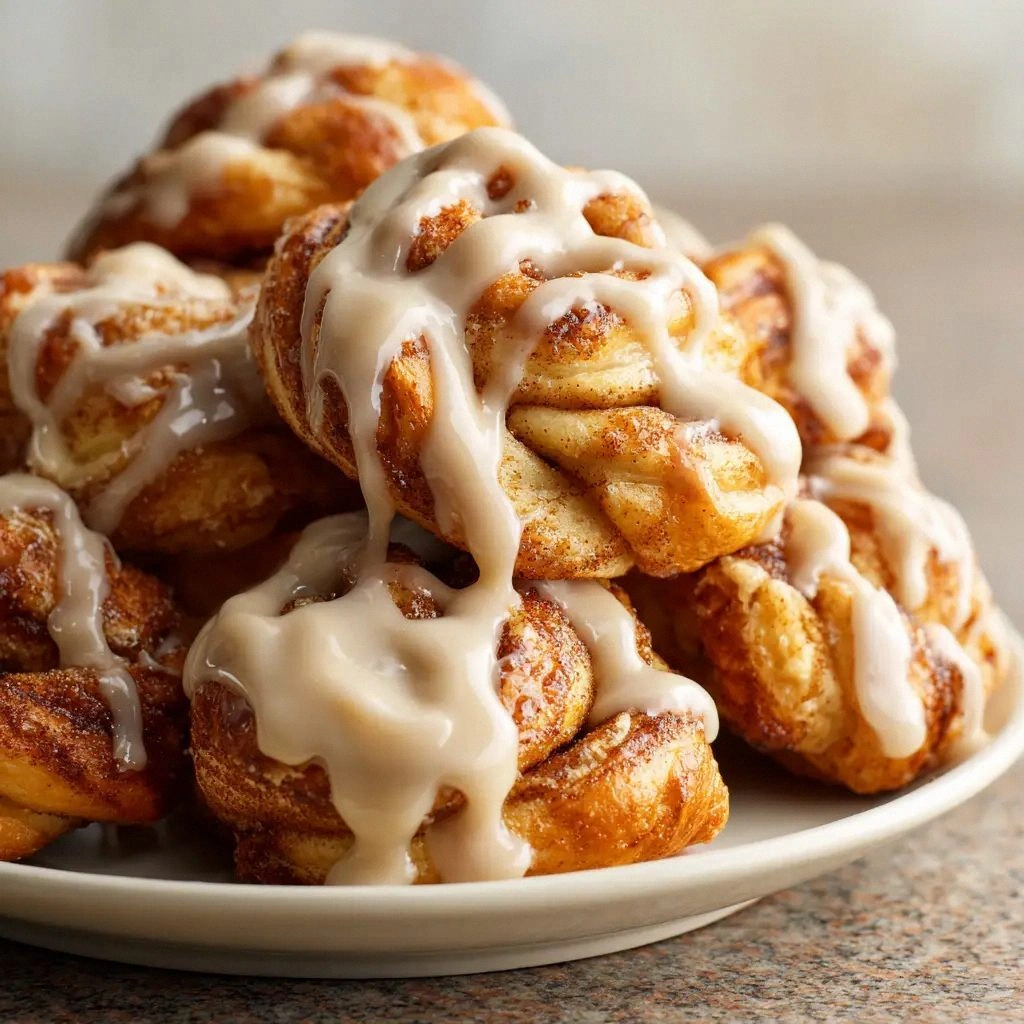
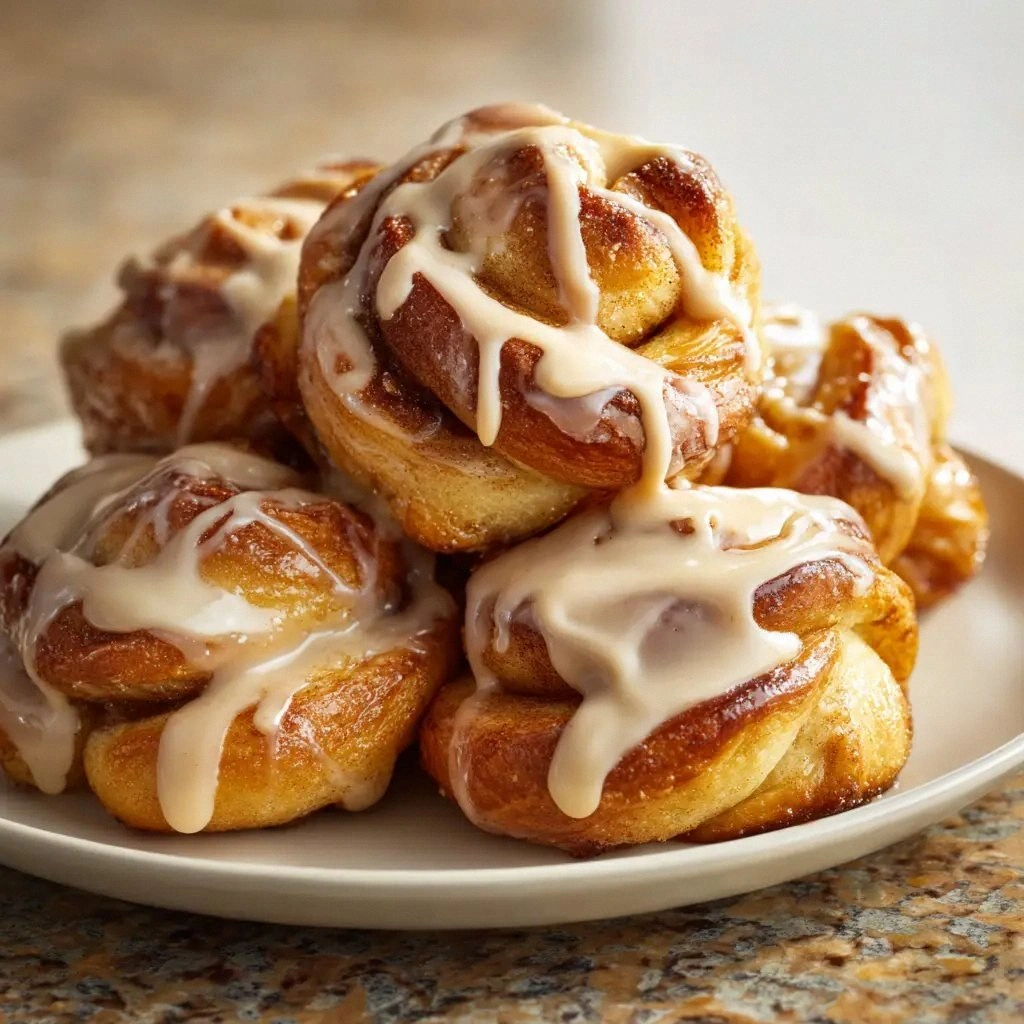
What sets this version apart? It’s a blend of precision and creativity. The dough is leavened twice, giving it a light, airy core, while the butter‑butter technique locks in moisture and flavor. The filling is a sweet, buttery cinnamon‑brown sugar mixture that caramelizes beautifully, creating a contrast between crunchy edges and a melt‑in‑your‑mouth interior. The glaze—powdered sugar mixed with a splash of milk or cream—adds a delicate sweetness that finishes the experience on a high note. This is hands down the best version you’ll ever make at home.
Picture yourself pulling these knots out of the oven, the whole kitchen smelling incredible, the knots gleaming with a glossy glaze, and the first bite releasing a burst of buttery cinnamon that lingers. I’ve refined every step to ensure that each knot is soft, fluffy, and irresistibly fragrant. Let me walk you through every single step—by the end, you’ll wonder how you ever made it any other way.
What Makes This Version Stand Out
- Flavor: A double‑layered dough and butter‑butter technique create a buttery richness that deepens the cinnamon kick without overpowering the sweetness.
- Texture: The dough’s two rises give it a light, airy crumb, while the glaze adds a subtle crispness that contrasts with the soft interior.
- Ease: Despite its complexity, the recipe uses pantry staples, making it accessible for beginners and seasoned bakers alike.
- Uniqueness: The buttery swirl and glaze are a twist on classic cinnamon rolls, offering a new dimension of flavor and presentation.
- Crowd Reaction: Friends and family rave about the melt‑in‑your‑mouth texture and the sweet, fragrant aroma that fills the house.
- Ingredient Quality: Using real butter and whole milk elevates the flavor profile, turning a simple snack into a gourmet treat.
- Method Simplicity: The recipe’s step‑by‑step guidance ensures that even a kitchen rookie can achieve professional results.
- Make‑Ahead Potential: The dough can be prepared a day in advance, allowing you to enjoy fresh knots without the rush.
Inside the Ingredient List
The Flavor Base
All‑Purpose Flour, Granulated Sugar, and Active Dry Yeast form the backbone of this dough. The flour provides structure, the sugar feeds the yeast for a robust rise, and the yeast brings that quintessential yeasty aroma. If you skip the yeast, the knots will be dense and flat, lacking the signature lift. For a slightly healthier twist, consider substituting half of the flour with whole wheat, but keep the yeast amount the same to maintain rise.
The Texture Crew
Whole Milk, Unsalted Butter, and a Large Egg work together to create a tender, moist crumb. The milk hydrates the flour and activates gluten, while the butter adds richness and a tender crumb. The egg provides structure and helps bind the dough. If you’re dairy‑free, replace the milk with oat or almond milk and the butter with coconut oil, but the texture will shift slightly toward a firmer bite.
The Unexpected Star
Brown Sugar and Ground Cinnamon form the sweet, caramelized filling that gives these knots their signature flavor. The brown sugar’s molasses content adds depth, while the cinnamon offers a warm, aromatic kick. Skipping the cinnamon turns the knots into plain sweet buns, losing the signature spice profile. For a spicy variation, add a pinch of cayenne pepper to the filling.
The Final Flourish
Powdered Sugar, Milk or Cream, and Vanilla Extract create the glaze that crowns each knot. The powdered sugar gives a sweet finish, the liquid lifts it into a silky glaze, and vanilla adds a subtle depth. If you prefer a lighter glaze, replace the milk with a splash of almond milk. The vanilla can be omitted if you’re short on time, but the final result will lack that nuanced flavor.
Everything’s prepped? Good. Let’s get into the real action.
The Method — Step by Step
- In a large mixing bowl, combine 4 cups of flour, 1/4 cup of granulated sugar, and 2 1/4 teaspoons of active dry yeast. Stir until the yeast is evenly distributed, then set aside for a minute. This step ensures that the yeast has no clumps and is ready to activate. I always whisk the dry ingredients first to avoid pockets of yeast that might cause uneven rising.
- Warm 1 cup of whole milk to about 110°F (43°C). Add 1/4 cup of unsalted butter, melted, and 1 large egg. Whisk until the mixture is smooth. The warm milk activates the yeast, while the butter and egg enrich the dough. If you’re short on time, you can use a microwave to heat the milk, but be careful not to scorch it.
- Pour the wet mixture into the dry ingredients and mix until a shaggy dough forms. Knead for about 8 minutes, either by hand or with a stand mixer, until the dough is smooth and elastic. The kneading process develops gluten, giving the knots their structure. I like to use a dough hook on medium speed to keep the dough from sticking to the bowl.
- Place the dough in a greased bowl, cover with a damp towel, and let it rise in a warm spot for 1 hour, or until it has doubled in size. The first rise is crucial for developing flavor and texture. I keep the bowl in the oven with the light on, which provides a consistent warm environment.
- While the dough rises, prepare the filling: In a bowl, mix 1 cup of brown sugar, 2 tablespoons of ground cinnamon, and 1/2 cup of unsalted butter until the butter melts and the sugar dissolves. This mixture should look glossy and slightly runny. If the mixture is too thick, add a teaspoon of warm water to loosen it. The butter‑butter technique ensures a silky, sweet filling that coats the dough evenly.
- After the dough has risen, punch it down gently to release air bubbles. Turn it onto a lightly floured surface and roll it out into a 16x12 inch rectangle. The dough should be about 1/4 inch thick. This is where the dough’s elasticity shows—if it resists rolling, let it rest for a few minutes before trying again.
- Brush the entire surface of the rolled dough with melted butter. Spread the cinnamon‑brown sugar filling evenly over the buttered surface, leaving a 1/2 inch border around the edges. Then, starting at the long side, roll the dough tightly into a log. The butter coating ensures the filling stays inside as you roll.
- Cut the log into 12 equal pieces, each about 2 inches long. Place the pieces on a parchment‑lined baking sheet, leaving a small gap between each knot. Brush the tops with melted butter again to give them a golden finish. Bake at 375°F (190°C) for 18-20 minutes, or until the tops are golden brown and the internal temperature reaches 190°F (88°C). The oven should smell like toasted butter and cinnamon—this is the moment of truth.
- While the knots are still hot, whisk 1 cup of powdered sugar with 1-2 tablespoons of milk or cream and 1/2 teaspoon of vanilla extract to create a glaze. Drizzle the glaze over the knots while they are still warm, allowing it to set into a glossy coating. Let them cool for a few minutes before serving. The glaze adds a sweet finish that balances the rich butter and cinnamon.
- Serve warm, preferably within 30 minutes of baking, to enjoy the full contrast of a soft, fluffy interior and a slightly crisp, glazed exterior. If you have leftovers, store them in an airtight container at room temperature for up to two days. For a quick snack, reheat them in a toaster or oven at 350°F for 3-4 minutes. The knots will taste almost brand new, with a fresh buttery aroma.
That’s it—you did it. But hold on, I’ve got a few more tricks that will take this to another level.
Insider Tricks for Flawless Results
The Temperature Rule Nobody Follows
The dough’s rise is temperature‑sensitive. If your kitchen is too cold, the yeast will slow down, leading to dense knots. Keep the dough in a warm, draft‑free spot—an oven with the light on works wonders. I’ve found that a 30-minute pre‑bake warm-up in the oven at 200°F (93°C) before placing the dough inside gives the yeast an extra kick.
Why Your Nose Knows Best
During the first rise, the dough should emit a pleasant yeasty aroma. If it smells off or sour, the yeast might be dead or the dough too wet. Trust your nose; a strong, sweet yeasty scent signals a good rise. If you’re unsure, perform a simple test: drop a small piece of dough in water—if it floats, it’s ready.
The 5-Minute Rest That Changes Everything
After rolling the dough into knots, let them rest for 5 minutes before baking. This brief pause relaxes the gluten, ensuring the knots rise evenly without cracking. I always set a timer and let the knots breathe; it’s a small step that makes a big difference.
The Secret to a Crispy Edge
Brush the tops of the knots with a thin layer of beaten egg before baking. The egg creates a golden, slightly crispy crust that contrasts beautifully with the soft interior. I use a pastry brush and a light touch—just enough to coat the surface without drowning the dough.
The Magic of Butter Swirl
Swirl a second pat of butter into the filling just before you roll the dough. This creates tiny pockets of melted butter that burst as the knots bake, delivering an extra burst of buttery flavor. I usually melt the butter and swirl it into the brown sugar mixture, then let it cool slightly before spreading.
The Final Glaze Touch
For an extra shine, add a pinch of powdered sugar to the glaze after it has set. This creates a subtle sparkle that looks as good as it tastes. I also experiment with adding a dash of espresso powder to the glaze for a mocha twist—perfect for coffee lovers.
Creative Twists and Variations
This recipe is a playground. Here are some of my favorite ways to switch things up:
The Chocolate Kiss
Add 1/4 cup of cocoa powder to the dough for a chocolatey base, and replace half of the brown sugar with dark chocolate chips in the filling. The result is a decadent, chocolate‑cinnamon knot that’s perfect for dessert lovers.
The Nutty Twist
Incorporate 1/2 cup of chopped pecans or walnuts into the dough, and sprinkle toasted nuts on top before glazing. The crunch adds texture, while the nutty flavor complements the cinnamon.
The Citrus Burst
Add zest of one orange or lemon to the dough, and use orange‑infused butter in the glaze. The citrus brightens the sweet flavor profile and adds a refreshing aroma.
The Savory Surprise
Replace the brown sugar with a mixture of grated Parmesan and herbs in the filling, and sprinkle a pinch of sea salt on top before glazing. The savory knots are ideal for brunch or a light dinner accompaniment.
The Gluten-Free Adventure
Swap the all‑purpose flour for a gluten‑free blend, and use xanthan gum according to the blend’s instructions. The dough will be denser, but the buttery filling and glaze will still deliver a delightful experience.
The Holiday Edition
Add a pinch of nutmeg and a splash of eggnog to the dough for a holiday twist. The warm spices and creamy flavor make these knots a festive treat during the winter months.
Storing and Bringing It Back to Life
Fridge Storage
Cool the knots completely, then wrap them tightly in plastic wrap and store in the refrigerator for up to 3 days. The cold environment keeps the butter from melting while preserving flavor. When ready to serve, let them sit at room temperature for 15 minutes before reheating.
Freezer Friendly
Place the knots in a single layer on a parchment paper‑lined tray and freeze for up to 2 months. Once frozen, transfer them to a zip‑lock bag. To thaw, leave them at room temperature for 2 hours or microwave on low for 30 seconds.
Best Reheating Method
Reheat frozen or chilled knots in a 350°F oven for 5-7 minutes, or until the glaze is slightly glossy again. Add a splash of water or a drizzle of milk before reheating to create steam, which restores the dough’s softness and prevents it from drying out.