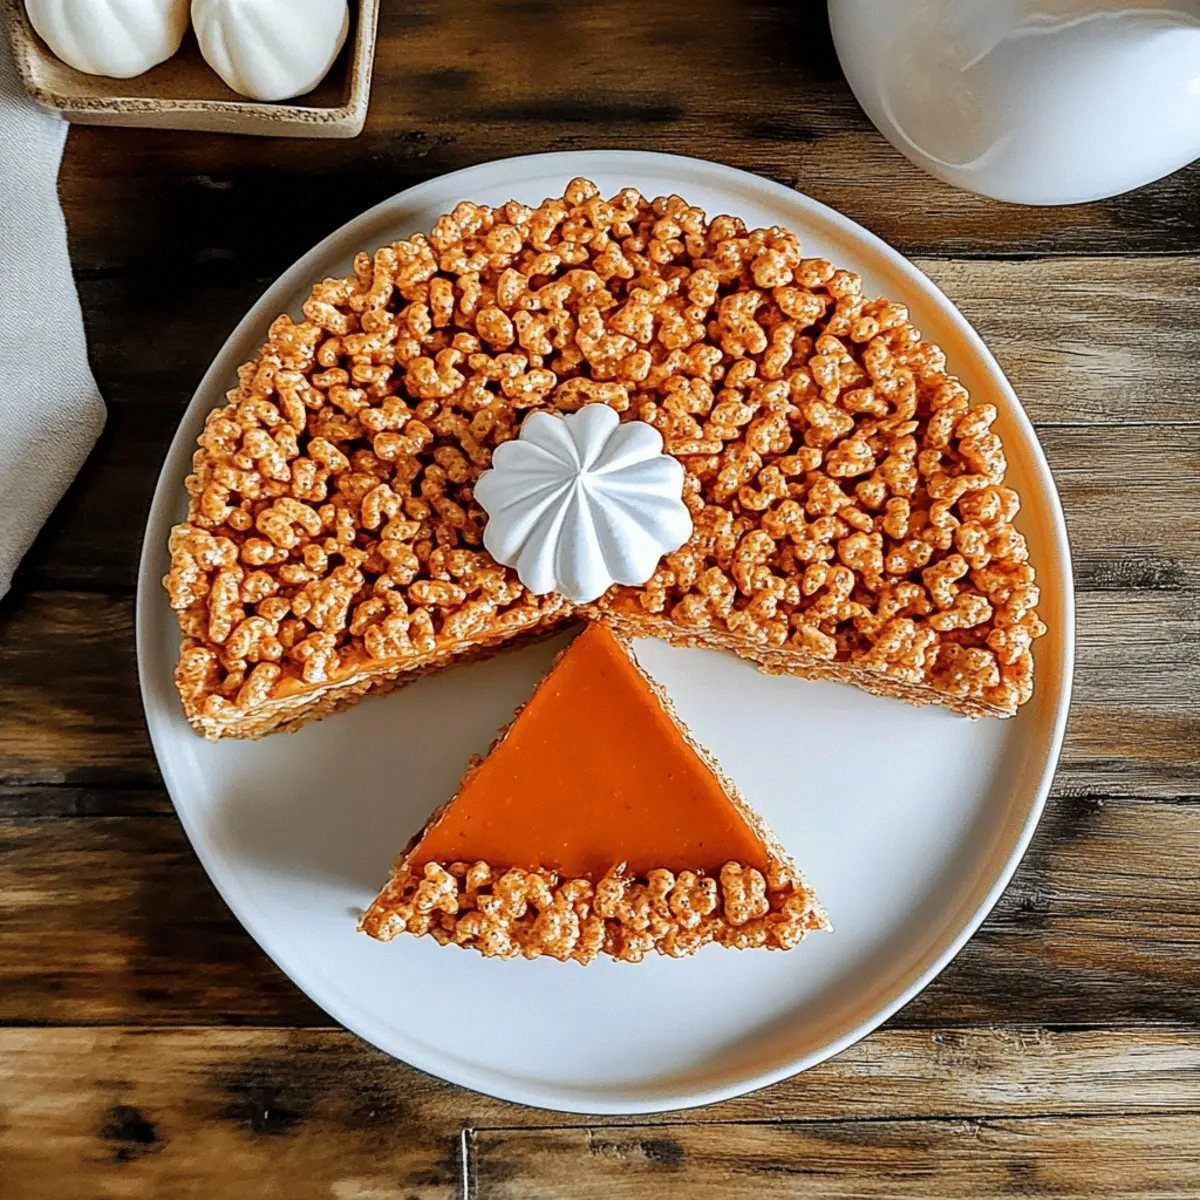
Picture this: it’s a crisp Saturday morning in late October, the kind where the air smells like damp leaves and the kitchen is the only warm refuge you need. I was halfway through a batch of ordinary Rice Krispies treats when my roommate, a die‑hard pumpkin‑pie fan, dared me to “make something that screams fall but still feels like a kid‑friendly snack.” I laughed, I scoffed, and then I grabbed a tub of marshmallows, a splash of orange food coloring, and a pinch of pumpkin pie spice. The result? A treat that turned my kitchen into a miniature autumn wonderland, and trust me, I dare you to taste this and not go back for seconds.
The moment the butter hit the pan, it sizzled like a tiny fireworks show, the aroma instantly wrapping the room in a buttery, caramel‑kissed hug. As the marshmallows melted, they turned a glossy amber, and when I swirled in the pumpkin spice, it released a perfume that reminded me of grandma’s kitchen on Thanksgiving—sweet, spicy, and undeniably comforting. The rice cereal was folded in with the delicacy of a snowflake landing on a warm mug, each piece staying crisp yet cloaked in that velvety marshmallow‑pumpkin glaze. When the final drizzle of orange food coloring hit the mix, it was as if a sunrise had been poured over a field of gold, giving the treats a festive hue that makes them perfect for any fall gathering.
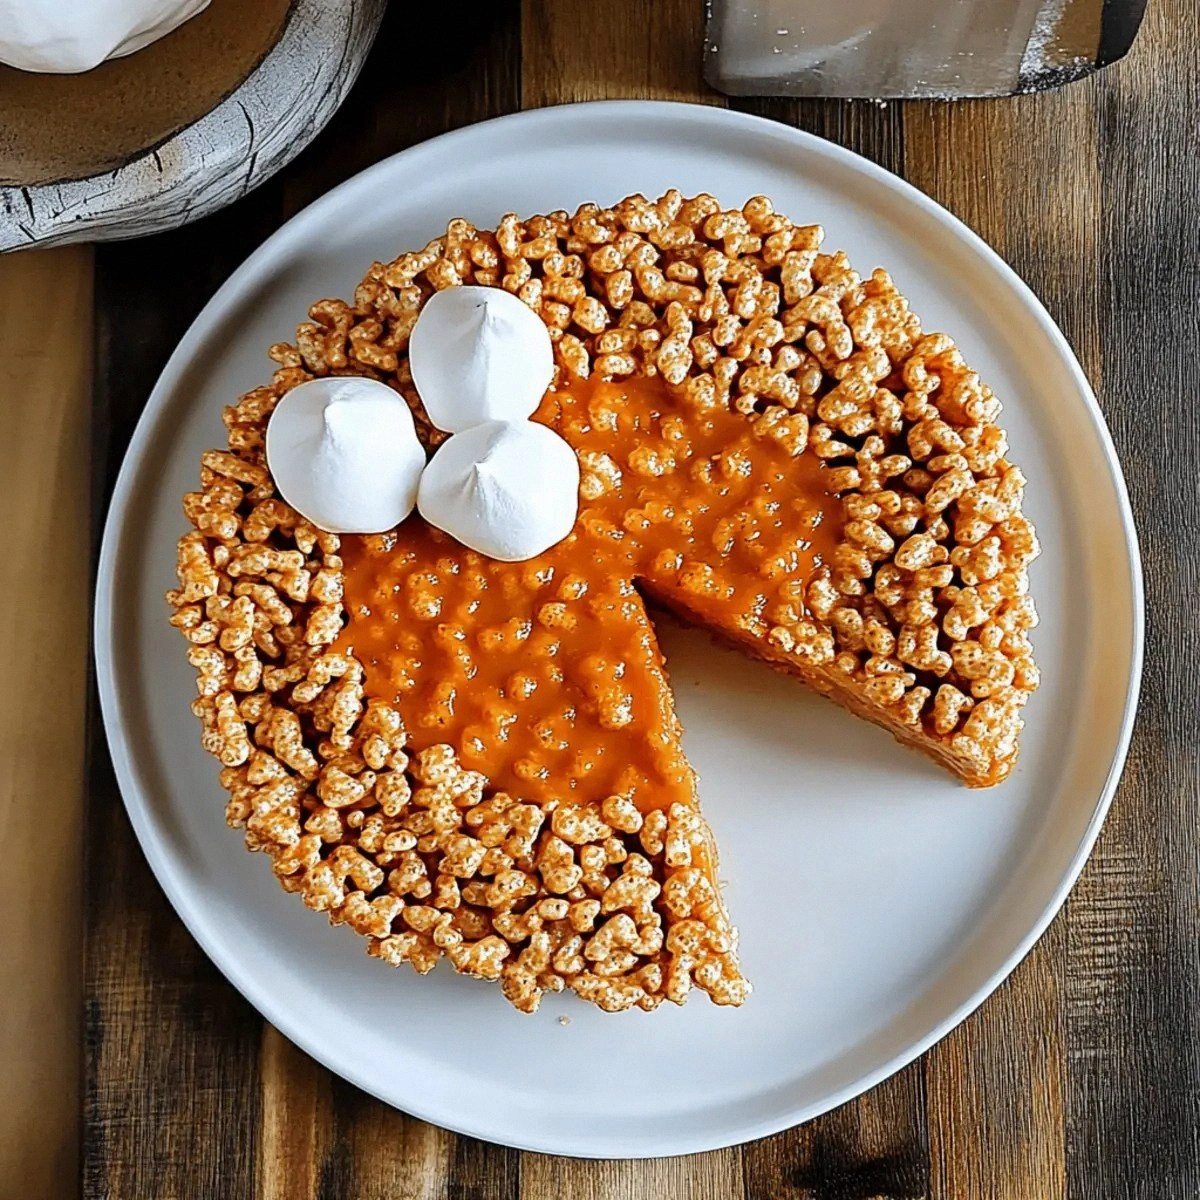
Most pumpkin‑pie‑inspired desserts try to be overly fancy, layering flavors in a way that ends up muddied and heavy. This version, however, hits the sweet spot between nostalgic comfort and seasonal flair. By using two different butter measurements and a double‑dose of marshmallows, the texture achieves a perfect balance: a crunchy bite that melts into a soft, gooey center, with a subtle spice kick that never overwhelms. The secret weapon? A few drops of orange food coloring that adds visual pop without compromising the classic flavor profile. I’ll be honest — I ate half the batch before anyone else got to try it, and that’s a testament to how addictive this is.
Let me walk you through every single step — by the end, you’ll wonder how you ever made it any other way. Okay, ready for the game‑changer? This next part? Pure magic. Stay with me here — this is worth it.
What Makes This Version Stand Out
- Flavor Fusion: The pumpkin pie spice melds seamlessly with the sweet marshmallow, creating a taste that feels both familiar and exciting, like a warm hug from a childhood memory.
- Texture Contrast: The crisp rice cereal provides a satisfying crunch that shatters like thin ice, while the marshmallow core stays soft and chewy, delivering a dual‑sensory experience.
- Simplicity: No ovens, no fancy equipment—just a pot, a spatula, and a handful of pantry staples, making it accessible for even the most kitchen‑phobic.
- Visual Appeal: The orange hue gives a festive pop that screams autumn, perfect for holiday tables or a cozy movie night.
- Crowd Reaction: Guests often claim this is the best version they’ve ever tasted, and it’s common to hear the phrase “I need the recipe!” shouted across the room.
- Ingredient Quality: Using unsalted butter lets you control the salt level, while fresh pumpkin pie spice ensures a robust, aromatic profile.
- Make‑Ahead Potential: These treats keep their texture for days, meaning you can prep them ahead of a party and still serve them fresh.
- Versatility: They double as a dessert, a snack, or even a playful addition to a brunch spread, fitting any occasion.
Inside the Ingredient List
The Flavor Base
Unsalted Butter (1.5 tbsp): This is the foundation of flavor, providing a rich, creamy backdrop without the interference of extra salt. If you skip it, the marshmallow won’t achieve that glossy, buttery sheen, and the overall taste can feel flat. For a dairy‑free twist, try coconut oil, but expect a subtle coconut note to surface.
Butter (2.5 tbsp): The second butter addition is introduced later to create a layered richness, ensuring the final treat has a buttery depth that lingers on the palate. Using a slightly higher‑fat butter will make the glaze silkier.
The Texture Crew
Marshmallows (2 cups) & Marshmallows (3 cups): The dual‑quantity approach gives a two‑stage melt: the first batch creates a smooth base, while the second batch, added later, adds a fluffy, airy lift. Skipping the second addition will result in a denser, less airy bite.
Rice Krispies Cereal (4 cups): The star of the show, these crisped rice puffs provide that iconic crunch. Opt for the original, not the honey‑nut version, to keep the flavor profile clean. If you’re gluten‑free, look for certified gluten‑free puffed rice.
The Unexpected Star
Pumpkin Pie Spice (1 tsp): This blend of cinnamon, nutmeg, ginger, and cloves brings the quintessential fall aroma. Freshly ground spices are far superior to pre‑ground mixes; they release essential oils that intensify the scent. If you’re out of spice, a dash of cinnamon plus a pinch of allspice works in a pinch.
Orange Food Coloring (a few drops): Not just for looks, a tiny amount of color can psychologically enhance the perception of flavor, making the treat feel more “autumnal.” Use gel‑based coloring to avoid adding extra liquid.
The Final Flourish
Whipped Cream (to taste): A dollop on top adds a light, airy contrast that cuts through the sweetness, turning each bite into a balanced symphony. If you’re dairy‑free, try a swirl of coconut whipped cream for a tropical twist.
Everything's prepped? Good. Let's get into the real action...
The Method — Step by Step
Gather all your ingredients and measure them precisely; this is the moment of truth where preparation meets anticipation. In a large saucepan, melt the 1.5 tablespoons of unsalted butter over medium heat until it foams, then add the first 2 cups of marshmallows. Stir constantly; you’ll hear a gentle hiss as the marshmallows begin to liquefy, releasing a sweet, caramel‑like scent that fills the kitchen.
Kitchen Hack: Keep the saucepan on low‑medium heat; too high and the marshmallows will scorch, turning bitter.Once the marshmallows are fully melted and the mixture is glossy, sprinkle in the pumpkin pie spice and a few drops of orange food coloring. Watch the color swirl like a sunrise over a pumpkin patch—this visual cue tells you the flavor infusion is happening. Stir for another 30 seconds, allowing the spices to bloom and the color to distribute evenly.
Now, introduce the second batch of butter (2.5 tablespoons). This addition creates a richer, silkier coating that will cling to every cereal piece later. As the butter melts, you’ll notice the mixture becoming slightly thicker, a sign that it’s ready for the next step. If you’re feeling adventurous, add a pinch of sea salt here to enhance the sweet‑spice balance.
Turn off the heat and quickly fold in the remaining 3 cups of marshmallows. They’ll soften instantly, creating a fluffy cloud that lightens the overall texture. This is where the “double‑marshmallow” technique shines; the first batch forms the base, while the second lifts the mixture, ensuring each bite is airy yet satisfyingly chewy.
Immediately pour the 4 cups of Rice Krispies cereal into the pot. Using a sturdy silicone spatula, fold the cereal in with a gentle tossing motion. The goal is to coat every puff without crushing it—think of it as dressing a salad, not mashing potatoes. You’ll hear a faint “crackle” as the cereal meets the warm marshmallow, a sound that promises crunch.
Transfer the mixture onto a parchment‑lined 9×13‑inch baking dish. With a lightly buttered spatula, press the mixture down firmly but not too hard; you want it compact enough to hold together, yet still airy. This step is crucial—if you over‑press, the treats become dense; under‑press, and they’ll crumble when sliced.
Watch Out: Let the mixture sit for 2 minutes before cutting; it needs a brief rest to set, otherwise the edges will pull apart.Allow the treats to cool at room temperature for about 20‑30 minutes. During this time, the marshmallow glaze will firm up, and the flavors will meld into a harmonious whole. Resist the urge to refrigerate early; rapid cooling can cause the treats to become too hard, losing that signature melt‑in‑your‑mouth feel.
Once set, cut the slab into squares or bars—whatever size fits your serving vision. I recommend a generous 2‑inch square for a perfect bite. Serve each piece with a dollop of whipped cream on top; the creamy swirl adds a light, airy contrast that elevates the entire experience.
Finally, gather your friends or family and watch their faces light up. Most people will claim they’ve never tasted anything like this, and you’ll find yourself repeating, “I told you this was the best version you’ll ever make at home.” Picture yourself pulling this out of the kitchen, the whole house smelling incredible, and knowing you’ve just created a fall classic.
That's it — you did it. But hold on, I've got a few more tricks that'll take this to another level...
Insider Tricks for Flawless Results
The Temperature Rule Nobody Follows
Keep your stovetop on medium‑low when melting butter and marshmallows. High heat can cause the sugars to caramelize too quickly, creating a bitter edge. I once tried a “speed melt” on high and ended up with a burnt, acrid flavor that ruined the whole batch. The secret is patience; a gentle heat lets the marshmallows melt evenly, preserving their natural sweetness.
Why Your Nose Knows Best
Trust the scent cues more than the clock. When the butter and marshmallows start to emit a nutty, toasty aroma, you’re at the perfect stage to add the spice. If you miss this window, the spice can taste muted. I’ve learned to pause, inhale deeply, and let my nose guide the timing.
The 5‑Minute Rest That Changes Everything
After pressing the mixture into the pan, let it sit untouched for exactly five minutes before cutting. This short rest allows the marshmallow matrix to set, ensuring clean cuts and preventing crumbly edges. Skipping this rest is the most common mistake I see; it results in ragged pieces that fall apart on the plate.
Butter Brush Boost
Before pressing the mixture into the pan, lightly brush the surface of the pan with melted butter. This not only prevents sticking but also adds a subtle buttery crust to the bottom of each bar, creating an unexpected layer of flavor and texture.
Whipped Cream Whisper
When adding whipped cream on top, do it while the treats are still slightly warm. The residual heat will gently melt the whipped cream’s edges, creating a silky glaze that fuses the two components. If you add the cream after the treats have fully cooled, you’ll get a stark contrast that can be too harsh.
Creative Twists and Variations
This recipe is a playground. Here are some of my favorite ways to switch things up:
Maple‑Pecan Crunch
Swap the orange food coloring for a drizzle of pure maple syrup and fold in ½ cup of toasted pecans. The maple adds a deep, caramelized sweetness while the pecans bring a buttery crunch that pairs beautifully with the pumpkin spice.
Chocolate‑Covered Delight
After the treats have set, dip each bar halfway into melted dark chocolate. The bitterness of the chocolate balances the sweet marshmallow, creating a sophisticated flavor profile perfect for a holiday party.
Spiced Chai Fusion
Replace the pumpkin pie spice with a chai spice blend (cinnamon, cardamom, ginger, clove). This gives the treats an exotic, warm twist that feels like a cozy tea‑time snack.
Vegan Version
Use coconut oil in place of both butter quantities and opt for vegan marshmallows. The result is a dairy‑free treat that still retains that glossy, buttery sheen, with a subtle coconut undertone that complements the spice.
Berry Burst
Fold in a half‑cup of freeze‑dried cranberries or dried cherries after adding the cereal. The tartness of the berries cuts through the sweetness, offering a burst of flavor in each bite.
Salted Caramel Swirl
After pressing the mixture into the pan, drizzle a thin line of homemade salted caramel sauce on top and use a skewer to swirl it through. The salty caramel ribbons add a luxurious depth that makes the treats feel indulgent.
Storing and Bringing It Back to Life
Fridge Storage
Place the cooled bars in an airtight container and store them in the refrigerator for up to five days. The cool environment keeps the marshmallow from becoming overly sticky, while the cereal stays crisp.
Freezer Friendly
Wrap each bar individually in parchment paper, then seal them in a zip‑top freezer bag. They’ll freeze beautifully for up to three months. When you’re ready to enjoy, let them thaw at room temperature for 15 minutes; the texture will be as fresh as the day you made them.
Best Reheating Method
To revive a slightly hardened bar, place it on a microwave‑safe plate, add a tiny splash (about 1 teaspoon) of water, and microwave for 10‑15 seconds. The steam generated re‑hydrates the marshmallow, restoring its melt‑in‑your‑mouth quality without making it soggy.