I swear, the first time I tried to make brownies for a holiday party, I ended up with a pan of bland, flat disappointment that looked like a sad, overcooked pancake. My friend dared me to bring something that would make everyone say, “Whoa, what is that magical chocolate‑peppermint explosion?” I accepted the challenge, but the kitchen turned into a battlefield of burnt sugar, over‑mixed batter, and a frosting that tasted like a toothpaste commercial. That disaster sparked an obsession: I was determined to crack the code on the ultimate peppermint brownie that could turn any skeptical palate into a fan club.
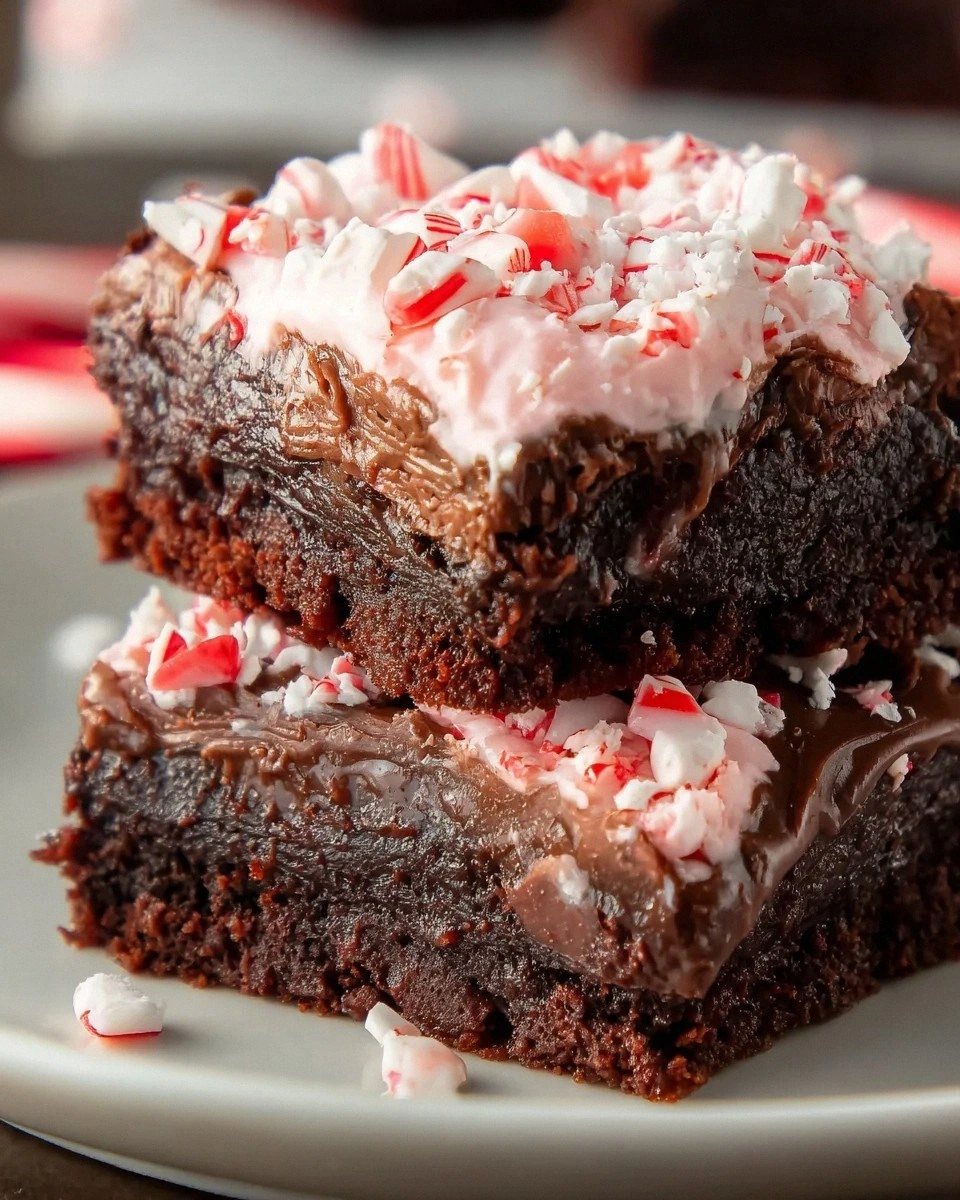
Picture this: you open the oven, and a wave of warm chocolate mingles with a crisp, minty breeze that instantly transports you to a winter wonderland, even if it’s July outside. The brownies themselves have that classic fudgy chew that stretches like a soft‑serve swirl, while the edges snap with a delicate crisp that shatters like thin ice under a spoon. On top, a glossy chocolate ganache glistens like a midnight lake, and a swirl of peppermint frosting adds a swirl of red‑tinged pink that looks as festive as a holiday wreath. Each bite delivers a contrast—rich cocoa, cool peppermint, and a buttery sweetness that makes your taste buds do a little dance.
Most recipes get this completely wrong. They either drown the chocolate in a sea of mint, or they sprinkle a handful of crushed candy canes on top and call it a day. The secret to this version is layering: a simple box brownie mix provides a reliable, fudgy foundation, while the peppermint frosting and chocolate ganache are built separately to keep their flavors bright and distinct. The crushed candy canes aren’t just a garnish; they’re folded into the frosting for that burst of peppermint crunch in every bite. I’ll be honest—I ate half the batch before anyone else got to try it, and that’s a confession I’m willing to make because the flavor is that good.
Okay, ready for the game‑changer? I’m about to walk you through every single step—from cracking the perfect eggs into the mix, to tempering the ganache so it sets like a glossy mirror, to the final dusting of candy cane confetti that will make your guests gasp. By the end, you’ll wonder how you ever made brownies any other way. Let me walk you through every single step — by the end, you'll wonder how you ever made it any other way.
What Makes This Version Stand Out
- Flavor Fusion: The peppermint frosting is infused with crushed candy canes, delivering a minty punch that doesn’t overwhelm the chocolate but dances alongside it.
- Texture Symphony: You get a fudgy interior, crisp edges, and a crunchy candy‑cane topping that adds a satisfying snap.
- Effortless Base: Using a boxed brownie mix guarantees consistent texture while saving you from the hassle of measuring flour, cocoa, and leavening.
- Visual Wow Factor: The red‑tinged frosting swirled with white ganache looks like a holiday masterpiece, perfect for Instagram.
- Crowd‑Pleaser: Even the most skeptical chocolate lovers admit that the peppermint twist makes these brownies unforgettable.
- Make‑Ahead Magic: The brownies keep their moisture for up to three days, and the frosting can be pre‑whipped and stored.
- Ingredient Quality: Semi‑sweet chocolate chips and real candy canes ensure authentic flavor without artificial aftertaste.
- Simple Scaling: The recipe scales beautifully; double the batch for a party or halve it for a cozy night in.
Inside the Ingredient List
The Flavor Base
The heart of these brownies is the boxed brownie mix. It’s pre‑balanced with cocoa, sugar, and leavening agents, ensuring a dense, fudgy crumb without any guesswork. If you skip the mix and try to build from scratch, you’ll likely end up with a cake‑like texture that won’t hold the ganache or frosting as well. For the best result, choose a mix that promises “chewy” or “fudgy” on the package, and avoid those marketed as “light” or “low‑fat.”
Water, eggs, and oil are the three companions that bring the mix to life. Water hydrates the dry ingredients, eggs provide structure and lift, and oil adds that melt‑in‑your‑mouth richness. If you’re out of vegetable oil, canola or melted coconut oil work just as well, but keep in mind coconut oil will add a faint tropical note that might clash with peppermint.
A pro tip: whisk the eggs lightly before adding them to the batter. This prevents streaks of egg white that can create a grainy texture in the final bake. And here’s a secret I discovered after many trials: a splash of vanilla extract (about ½ tsp) amplifies the chocolate flavor without stealing the spotlight from the peppermint.
The Texture Crew
Crushed candy canes are the crunch factor that turns a good brownie into a show‑stopper. When you crush them, aim for a mix of fine dust and larger shards; the dust will melt into the frosting, while the shards stay crunchy. If you over‑process them into a powder, you’ll lose that satisfying snap. I recommend placing the candy canes in a zip‑top bag and using a rolling pin—quick, controlled, and no mess.
The chocolate ganache is a luxurious coating made from semi‑sweet chocolate chips and heavy cream. The ratio of 2:1 (chocolate to cream) yields a glossy, firm ganache that sets at room temperature but stays soft enough to cut through with a fork. If you prefer a softer ganache, add an extra tablespoon of cream; for a firmer finish, increase the chocolate by ¼ cup.
Fun Fact: The term “ganache” originally referred to a French word for “jowl” because the mixture was once used as a filling for pâtés. Today, it’s the crown jewel of dessert glazes, and it’s surprisingly simple—just heat, stir, and cool.
The Unexpected Star
Peppermint frosting is where the magic truly happens. Softened butter provides a creamy base, while confectioner’s sugar gives the frosting its silky texture. Heavy whipping cream adds just enough moisture to keep it spreadable, and a few drops of red food coloring turn it into a festive pink‑red swirl that looks as good as it tastes. If you’re allergic to dairy, substitute the butter with a plant‑based margarine and the cream with coconut cream; the flavor will shift slightly, but the texture remains.
Don’t forget the crushed candy canes in the frosting! They infuse the buttercream with peppermint oil from the candy, creating pockets of cool flavor that burst when you bite. Skipping this step is a common mistake that results in a bland frosting that feels more like plain buttercream than a peppermint experience.
The Final Flourish
A final dusting of extra crushed candy canes on top adds visual sparkle and an extra crunch layer. This is the moment where the brownies become Instagram‑ready, with the red‑pink frosting swirling like a holiday ribbon. If you want an extra touch of elegance, sprinkle a pinch of flaky sea salt over the ganache before it sets; the salt accentuates the chocolate and balances the mint’s sweetness.
Buying tip: Look for candy canes that are made with real peppermint oil rather than artificial flavor. The genuine oil provides a brighter, cleaner mint note that stands up to the richness of chocolate.
Everything's prepped? Good. Let's get into the real action...
The Method — Step by Step
Preheat your oven to 350°F (175°C) and line a 9×13‑inch baking pan with parchment paper, letting the edges overhang for easy removal later. The moment the oven clicks on, you’ll hear that comforting hum that signals chocolate magic is about to happen. While the oven warms, gather your brownie mix, water, eggs, and oil. I like to whisk the wet ingredients together in a separate bowl to avoid any flour pockets that could turn the batter gritty.
In a large mixing bowl, combine the brownie mix with the wet ingredients. Stir until just blended—don’t over‑mix, or you’ll develop gluten and lose that coveted fudgy texture. The batter should look glossy and thick, like a rich chocolate lava flow. That sizzle when it hits the pan? Absolute perfection.
Pour the batter into the prepared pan, spreading it evenly with a spatula. Here’s a pro tip: tap the pan gently on the countertop three times to release any air bubbles that might cause uneven baking. The surface should be smooth, with a slight sheen that promises a glossy top after baking.
Slide the pan into the oven and bake for 20 minutes, then check the edges. They should start pulling away from the sides of the pan, a sign that the crumb is setting. Insert a toothpick into the center; you’ll see a few moist crumbs but no wet batter. The aroma at this stage is a heady mix of chocolate and toasted sugar that will make your kitchen feel like a bakery.
While the brownies bake, start the chocolate ganache. Heat ½ cup heavy cream in a small saucepan over medium heat until it just begins to simmer—tiny bubbles will form around the edges. Remove from heat and pour over 1 cup semi‑sweet chocolate chips in a heat‑proof bowl. Let sit for a minute, then stir gently until the mixture is glossy and smooth. This is the moment of truth: the ganache should coat the back of a spoon without streaks.
Now for the peppermint frosting. In a large bowl, beat ½ cup softened butter until light and fluffy—about 2 minutes on medium speed. Gradually add 2 cups confectioner’s sugar, beating after each addition to keep the mixture smooth. Add 2 tbsp heavy whipping cream and a few drops of red food coloring; beat until the frosting reaches a spreadable consistency. Finally, fold in 1 cup crushed candy canes, reserving a tablespoon for the topping.
When the brownies have baked for 30 minutes total, remove them from the oven and let them cool in the pan for 10 minutes. While they’re still warm, drizzle the chocolate ganache over the top, using a spatula to spread it into a thin, even layer. The ganache will start to set as it cools, creating that glossy finish that looks like a mirror on a chocolate lake.
Once the ganache has set (about 5 minutes), spread the peppermint frosting over the ganache in a thick, swirly layer. Use an offset spatula to create peaks and valleys—this is where the visual drama happens. Sprinkle the reserved crushed candy cane shards across the frosting, pressing lightly so they adhere.
Allow the assembled brownies to cool completely—ideally at least an hour—so the frosting sets and the ganache firms up. Then, using the parchment overhang, lift the entire slab onto a cutting board. Cut into squares with a sharp knife, wiping the blade clean between cuts for neat edges. Serve immediately, or store as instructed below. That first bite? Pure holiday bliss.
That's it — you did it. But hold on, I've got a few more tricks that'll take this to another level...
Insider Tricks for Flawless Results
The Temperature Rule Nobody Follows
Never bake brownies on a cold rack. Let the oven fully preheat and keep the door closed for the first 15 minutes. This ensures even heat distribution and prevents the edges from over‑cooking while the center stays under‑baked. I once tried a “quick‑heat” method and ended up with a brownie that looked like a chocolate crater—uneven and disappointing.
Why Your Nose Knows Best
When the brownies are about 20 minutes in, trust your sense of smell more than a timer. The moment you catch that sweet, toasted chocolate aroma, you’re close to perfection. If you wait for the timer to hit the exact minute, you risk drying them out. This sensory cue is the secret weapon of seasoned bakers.
The 5‑Minute Rest That Changes Everything
After pulling the brownies from the oven, let them rest uncovered for exactly five minutes before adding the ganache. This short pause lets the steam escape, preventing the ganache from sliding off. It also allows the crumb to firm up just enough so you get clean cuts later.
Candy Cane Crunch Preservation
If you love the crunch of candy canes but notice them softening after a day, toss a handful into a zip‑top bag and freeze them for 10 minutes before sprinkling on top. The cold shock re‑hardens the sugar crystals, preserving that satisfying snap.
Ganache Gloss Boost
For an extra‑shiny ganache, add a teaspoon of corn syrup while stirring. It creates a thin film that reflects light like a polished jewel, making the brownies look even more irresistible. Just a tiny amount—too much will make the ganache overly sweet.
Creative Twists and Variations
This recipe is a playground. Here are some of my favorite ways to switch things up:
Mocha Mint Fusion
Add a tablespoon of instant espresso powder to the brownie mix and swap half the candy canes for crushed coffee‑flavored chocolate. The result is a deep, earthy chocolate with a bright peppermint finish—perfect for coffee lovers.
White Chocolate Peppermint Swirl
Replace the semi‑sweet chocolate chips in the ganache with white chocolate chips and stir in a teaspoon of peppermint extract. The white chocolate adds a buttery sweetness that pairs beautifully with the minty frosting.
Nutty Peppermint Crunch
Fold ½ cup toasted chopped pecans or almonds into the brownie batter before baking. The nuts add a buttery crunch that contrasts with the soft crumb and adds a nutty depth to the overall flavor.
Vegan Holiday Version
Swap the butter for a plant‑based margarine, use coconut cream in place of heavy cream, and choose a dairy‑free chocolate chip brand. The texture stays indulgent, and the peppermint still shines through.
Spicy Peppermint Surprise
Add a pinch of cayenne pepper to the frosting for a subtle heat that awakens the palate. The heat doesn’t overpower the mint; instead, it adds a lingering warmth that makes the brownies feel extra festive.
Storing and Bringing It Back to Life
Fridge Storage
Place the cooled brownies in an airtight container and store them in the refrigerator for up to five days. The frosting stays firm, and the ganache retains its glossy sheen. Before serving, let them sit at room temperature for 15 minutes to soften the frosting slightly.
Freezer Friendly
Wrap individual squares tightly in plastic wrap, then place them in a freezer‑safe zip‑top bag. They’ll keep for up to three months. When you’re ready to enjoy, thaw overnight in the fridge, then bring to room temperature for 20 minutes. A tiny splash of water brushed onto the surface before reheating will steam the frosting back to its original softness.
Best Reheating Method
To revive a refrigerated brownie, preheat your oven to 300°F (150°C), place the brownie on a baking sheet, and warm for 8‑10 minutes. The gentle heat revives the fudgy interior while the ganache and frosting melt just enough to become silky again. Avoid microwaving; it makes the frosting rubbery and the ganache greasy.